Der Pilzanbau in Indien wächst Schritt für Schritt als alternative Einnahmequelle für viele Menschen. Weltweit, die USA, China, Italien und die Niederlande sind die größten Pilzproduzenten. In Indien, Uttar Pradesh ist der führende Pilzproduzent, gefolgt von Tripura und Kerala.
Was ist Pilzzucht?
Pilze sind der Fruchtrahmen eines Pilzes, so wie Äpfel die Fruchtkörper eines Apfelbaums sind. Ein Pilz ist eine Pilzart mit dem lateinischen Namen Agaricus bisporus. Pilze, die zu Pilzarten gehören, sind eine nahrhafte vegetarische Delikatesse und eine gute Quelle für hochwertiges Protein (20-35 Prozent Trockengewicht). Derzeit werden 3 Pilzsorten kultiviert, nämlich:weißer Champignon (Agaricus bisporus), der Reisstrohpilz (Volvariella volvacea) und der Austernpilz (Pleurotus Sajor-Caju).
Im Pflanzenreich, Pilze werden mit heterotrophen Organismen (niedere Pflanzen) eingeordnet. Im Gegensatz zu hoch, grüne Pflanzen, Diese Heterotrophen sind nicht in der Lage, Photosynthese zu betreiben. Pilze sind die Aasfresser der Natur. Bei der Pilzzucht, Abfallwaren bestehend aus Hühnermist, Pferdemist, Stroh, Gips und Abwässer (aus eigenem Kompost) werden verwendet, um das hochbefriedigende Substrat bereitzustellen, aus dem Pilze wachsen. Das Ammoniak wird durch einen Ammoniakwäscher aus der Prozessluft entfernt, bevor es der Natur wieder zugeführt wird. Auch Ammoniak aus der Luft wird bei der Kompostierung als Stickstoffquelle verwendet.
Der Pilz, auch als Myzel bezeichnet, nutzt Gülle als Energiequelle für die Verbrennung, Energie freisetzen, die für das Wachstum verwendet wird. Pilze enthalten viele Vitamine und Mineralstoffe, wie B-Komplex und Eisen, und sind eine gute Quelle für hochwertige Proteine wie Lysin. Pilze sind völlig fettfrei (Cholesterin) und auch reich an Antioxidantien.
Verschiedene Arten des Pilzanbaus in Indien:
Es gibt drei Arten von Pilzen, die in Indien angebaut werden:Sie sind Champignons, Strohpilz und Austernpilz. Paddy-Strohpilze können sich bei Temperaturen von 35⁰ bis 40⁰C entwickeln. Champignons wachsen irgendwann im Winter. Austernpilze werden in den nördlichen Ebenen angebaut. Alle drei Pilze von geschäftlicher Bedeutung werden mit Hilfe einzigartiger Techniken gezüchtet. Sie werden auf außergewöhnlichen Beeten, den Kompostbeeten, angebaut. Erfahren Sie, wie Sie Pilze jeder Art domestizieren.
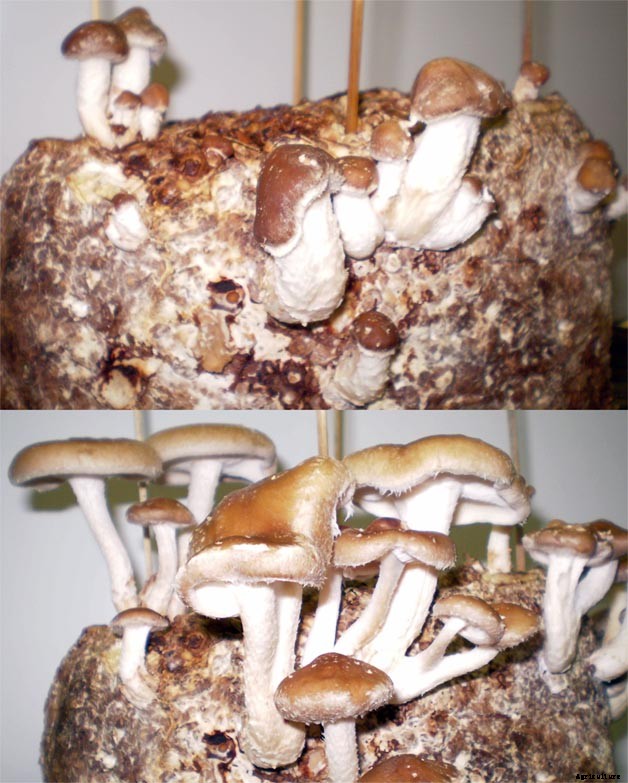
Schritte der Pilzzucht:
Die sechs Schritte der Pilzzucht werden wie folgt beschrieben:
Schritt 1:Kompostvorbereitung
Um mit dieser fabelhaften Landwirtschaftsidee zu beginnen, müssen wir uns direkt mit dem Konzept der „Kompostbereitung“ befassen.
Dieser erste Schritt der Kompostvorbereitung wird im Allgemeinen im Freien durchgeführt, obwohl eine geschlossene Struktur mit einem Schatten darüber verwendet werden könnte. Hier eine Betonplatte, auch als Kai bekannt, wird für die Kompostierung benötigt. Plus, ein Kompostwender zum Belüften und Bewässern der Zutaten, und es wird ein Wagen benötigt, um die Zutaten zum Wender zu transportieren.
In früheren Zeiten wurden Haufen mit Mistgabeln von Hand gewendet, die immer noch eine Alternative zu mechanischen Werkzeugen und Geräten ist, aber es ist ziemlich arbeitsintensiv und körperlich anstrengend für einen Job wie diesen.
Alles wird durch das Mischen und Befeuchten der erforderlichen Zutaten eingeleitet, während sie in einem Stapel rechteckiger Formen mit engen Seiten und einer losen Mitte gestapelt werden. Normalerweise, die Schüttgüter werden durch einen Kompostwender gegeben. Nachdem dieses Wasser beispielsweise auf den Pferdemist oder synthetischen Kompost gestreut wird, wenn sich diese Materialien am Wender vorbeibewegen. Nun werden Stickstoffzusätze und Gips (CaSO4. 2H2O) über die Schüttgutzutaten verteilt und vom Wender sorgfältig und sorgfältig gemischt. Sobald der Stapel durchnässt und geformt ist, Die Fermentation (Kompostierung) beginnt durch das exponentielle Wachstum und die Vermehrung von Mikroorganismen, Dies ist ein natürlicher Prozess in den Hauptbestandteilen.
Dieser Kompost für den Pilzanbau entsteht, indem die chemische Natur der Rohstoffe durch die Aktivität von Mikroorganismen umgewandelt wird, Wärme, und einige exotherme chemische Reaktionen. Diese Dinge führen kumulativ zu einer Nahrungsquelle, die am besten für das Wachstum des Pilzes geeignet ist und auch die Entwicklung anderer Pilze und Bakterien hemmt. Es muss optimale Feuchtigkeit vorhanden sein, Sauerstoff, Stickstoff, und Kohlenhydrate, die während des gesamten Prozesses vorhanden sind, Andernfalls, der Prozess könnte anhalten. Aus diesem Grund werden Wasser und andere Zusatzstoffe zyklisch und periodisch zugegeben, und der Komposthaufen wird bewegt, während er sich durch den Wender bewegt.
Interessanterweise wird hier Gips hinzugefügt, um die Viskosität zu minimieren, die der Kompost normalerweise hat. Gips erhöht die Fließfähigkeit bestimmter Chemikalien im Kompost, und sie haften eher an Stroh oder Heu, als dass sie die Porosität zwischen den Strohhalmen behindern. Abgesehen davon, der Nebeneffekt dieses Phänomens ist, dass die Luft den Haufen bequem durchdringen kann, und die Luft ist für den Kompostierungsprozess unerlässlich. Der Luftabschluss führt zu einer anaeroben Umgebung, in der faulige chemische Verbindungen gebildet werden, die für die Kulturpflanzen äußerst schädlich sind. Gips wird zu Beginn der Kompostierung mit ungefähr 18 kg pro Tonne Trockenbestandteile hinzugefügt.
Eine weitere wichtige Ergänzung sind die Stickstoff-Ergänzungen, die heute allgemein verwendet werden, umfassen Biergetreide, Samenmehle von Sojabohnen, Erdnüsse, oder Baumwolle, und Hühnermist, usw. Der einzige Zweck dieser Ergänzungsmittel besteht darin, den Stickstoffgehalt auf 1,5 % für Pferdemist oder 1,7 % für synthetischen, beide auf Trockengewichtsbasis berechnet. Synthetischer Kompost erfordert die Zugabe von Ammoniumnitrat oder Harnstoff zu Beginn der Kompostierung, um die Kompostmikroflora mit einer leicht verfügbaren Form von Stickstoff für ihre Reproduktion und ihr Wachstum zu versorgen.
Aber manchmal sind die Maiskolben nicht oder zu einem als exorbitant angesehenen Preis erhältlich. Ersatz für Maiskolben sind zerkleinerte Hartholzrinde oder Sägemehl, zum Beispiel, Baumwollsamenschalen, neutralisierter Traubentrester, Kakaobohnenschalen, und neutralisierter Traubentrester. Die Bewirtschaftung eines Komposthaufens, der eines dieser Materialien enthält, ist einzigartig in Bezug auf die Anforderungen an die Bewässerung und das Intervall zwischen dem Umdrehen des Haufens.
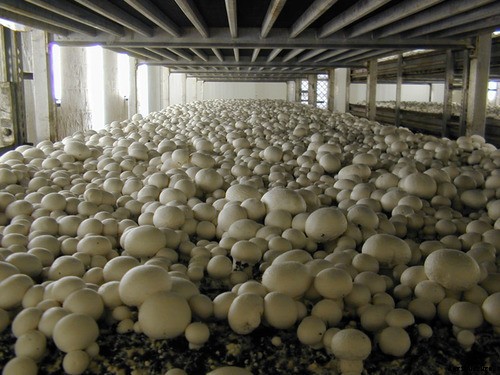
Am Anfang, Der Komposthaufen sollte 5 bis 6 Fuß breit sein, 5 bis 6 Meter hoch, und damit langwierig. Eine zweiseitige Schachtel kann verwendet werden, um den Stapel (Rick) zu bilden, Einige Dreher sind jedoch mit einem „Ricker“ ausgestattet, sodass keine Box benötigt wird. Die Seiten des Stapels sollten fest und dicht sein, das Zentrum muss jedoch während der gesamten Phase I der Kompostierung locker bleiben. Da das Stroh oder Heu bei der Kompostierung weich wird, die Materialien werden weniger steif und es kann leicht zum Schrumpfen kommen. Wenn die Materialien zu kompakt werden, Luft kann nicht um den Haufen herum lauern und es würde eine luftlose Umgebung entstehen.
Dieser anfängliche Kompostierungsprozess dauert nicht länger als ein paar Wochen, abhängig von der Beschaffenheit des Materials am Anfang und seinen Eigenschaften an jedem Punkt. Mit der Kompostierung ist ein starker Ammoniakgeruch verbunden, die in der Regel durch eine süße, schimmeliger Geruch. Wenn die Komposttemperaturen 68 Grad Celsius und mehr betragen, und Ammoniak vorhanden ist, Es treten chemische Veränderungen auf, die dazu führen, dass die Pilze eher ausschließlich ernähren.
Als Nebenprodukt der chemischen Veränderungen Wärme wird freigesetzt und die Komposttemperaturen steigen. Die Temperaturen im Kompost können während der zweiten und dritten Runde 76 bis 82 Grad Celsius erreichen, wenn ein wünschenswertes Maß an biologischen und chemischen Aktivitäten stattfindet. Am Ende der ersten Phase sollte der Kompost:1) eine schokoladenbraune Farbe haben; 2) haben weich, zarte Strohhalme, 3) einen Feuchtigkeitsgehalt von etwa 68 bis 74 Prozent haben; und 4) einen starken Ammoniakgeruch haben. Wenn die Feuchtigkeit Temperatur, Farbe, und Geruch beschrieben wurden erreicht, Herzliche Glückwünsche! Sie sind jetzt mit Schritt 1 fertig.
Ich hoffe, Sie haben Phase I der Pilzzucht genossen!
Schritt 2:Fertigstellen des Komposts
So, Beenden wir einfach den Kompostierungsprozess.
Nachdem Sie die Kompostierung der ersten Phase beendet haben, we’ll be heading towards the second and extremely important step that is “Finishing the Compost”.
So, here are two major reasons for Phase two or step 2 of composting. Pasteurization is necessary to kill any unwanted bacteria, Insekten, nematodes, Schädlinge, Pilze, or other headaches that may be present in the compost. And secondly, it is necessary to remove the ammonia which formed during Phase I composting. Ammonia at the end of Step 2 in a concentration higher than 0.07 per cent is often dangerous to mushroom spawn growth, so it must be eliminated; On average, a person can sense ammonia when the concentration reaches the threshold of 0.10 per cent.
Whether the compost is kept in beds, Tabletts, or bulk, should be spread uniformly in-depth and compression or density. Compost density should allow for the gas to move around, this would make sure that ammonia and carbon dioxide would be replaced by the outside air.
Step 2 composting can be perceived as a regulated, temperature-dependent, ecological process using air to maintain the compost in a temperature range optimal for the de-ammonifying organisms to grow and reproduce. The growth of these thermophilic (heat-loving) organisms depends on the availability of usable carbohydrates and nitrogen, some of the nitrogen in the form of ammonia.
Optimum management for Phase II is difficult to pinpoint and most growers(commercial) tend toward one of the two systems in common use today:high temperature or low temperature. Due to the jargon nature of this process, it’s quite difficult to put the variables into exact numbers.
For that, you need to consult online, with someone who has experience in this field and it’s better if you find that person in your vicinity.
Step 3:Spawning
Mushroom spawning is similar to the seedling stage in agriculture and means keeping the spawn (mycelium) of mushrooms that can be purchased from a laboratory at nominal prices. After laying the spawns evenly on the tray and distributing it ergonomically, cover it with a thin layer of compost and keep it moist. Cover the tray with a wet sheet of paper and sprinkle water at regular intervals. The trays can be stacked on top of each other at a spacing of 15–20 cm. Keep the walls and floors wet to maintain a humidity-filled environment and temperature at 25 ° C.
Step 4:Casing
Be a bit vigilant about this one!
The casing is a covering applied to the spawn-run compost on which the mushrooms slowly and steadily form. The constituents are, field soil clay-loam, a mixture of peat moss with ground limestone, or reclaimed weathered, spent compost that could be utilised as the casing.
The Casing doesn’t require nutrients as the casing only acts as a water reservoir and a place where the formation of rhizomorphs takes place. The Rhizomorphs look like thick strings and form when the very fine mycelium fuses.
Casing must be pasteurized to eliminate any insects and pathogens which it might be carrying. It’s also quite important that the uniformity of the layers remains intact. This allows the spawn to move into and through the casing at the same pace and, letzten Endes, mushroom growth happens tauta chromatically. The casing should be able to retain moisture since moisture is essential for the development of a healthy mushroom.
The crop management after casing requires that the compost temperature be kept at around 24° C for up to 5 days after casing, and the relative humidity should be high. Danach, the compost temperature should be lowered to about -16.5°C each day until small mushroom initials have formed. Throughout the period following casing, water must be applied periodically to raise the moisture level to field capacity before the mushroom pins form. Wissen, wann, how, and how much water to apply to casing is an “art form” which is the subtle difference that acts as a trench between experienced growers from beginners.
Step 5:Pinning
The Mushroom instigates as and when rhizomorphs have started growing in the casing. The initials are minuscule but can be seen protruding on a rhizomorph. Once an initial grow four folds in size, the structure is a pin. Pins continue to grow larger through the button stage, and ultimately a button enlarges to a mushroom. The harvestable crop appears after around three weeks or maybe a few days here and there. Pins develop when the carbon dioxide content of room air is lowered to 0.08 per cent or lower, depending on the skill set of the grower, by introducing clean and fresh air into the growing room. Outside air has a CO² content of about 0.04 %.
If the CO² is lowered too early by airing too soon, the mycelium ceases to grow through the casing and mushroom initials plunge to the surface of the casing. As such mushrooms continue to thrive, they push through the casing and are tedious at harvest time. Too little wetness can also result in mushrooms forming below the surface of the casing. Pinning affects both the potential yield and quality of a crop and is a stepping stone in the production cycle.
Step 6:Cropping
It’s the final but a step of utmost importance. The value you’ll be generating out of this business always goes hand in hand with the ingenuity you’re putting in the cropping process.
It varies from person to person and depends upon the given below factors:
These were some of the variables you have to take care of if you want good returns. This comes in naturally as you get more and more experienced in the trade.
Disease and pest controlling measures in Mushroom Farming:
Mushroom flies:
These flies are small, empfindlich, Schwarz, yellowish or sometimes brown with different types of wing venation and size.
Verwaltung:
Spring is inside the wall of the mushroom house.
The insecticide should be added in the last turning of the compost.
Mites:
They are small in size and are Majorly white, yellow, red and brown.
They can be found running over the surface of the fruit bodies, mushroom beds and on the floors and walls of the mushroom houses.
They damage the crop by feeding on the spawn to make holes in the mushroom caps and stalks and cause stunting of fruit bodies as well as brown spots on the caps and stems.
Verwaltung:
Proper pasteurization of compost.
Proper hygiene and sanitation.
Disinfection of the mushroom houses by spraying 0.1% dicofol.
Burning sulphur in the empty room.
Springtails:
They are silver-grey 2 brown colours with a light violet band along the sides of the body and black cellular fields present on the head.
They are the main species that damage mushrooms.
They enter mushroom houses along with organic matter.
They feed on mycelium from spawn.
They also feed on the gills of the oyster mushroom destroying the lining and spit out the mycelial strands at the base of the stripes.
They also attack the fruiting bodies of button mushrooms and cause slight pitting and browning at feeding sites.
Verwaltung:
Cleaning surrounding and inside of the mushroom house.
Proper disposal of spent compost.
Proper pasteurization of composed and casing material.
Raising the crop above the floor level.
Krankheiten:
Fungal diseases dry bubble:Verticillium fungicola
They are Muddy brown, often sunken spots on the cap of the mushrooms.
Greyish white mouldy
growth was seen on the pileus.
In a later stage, der Pilz
becomes dry and leathery.
Verwaltung:
Use clean equipment.
Control flies and mites.
Sanitary condition in growth house.
Bubbles can be destroyed with salt.
Infected mushrooms should be destroyed to prevent the spread.
Wet bubble:
Mycogen perniciosa:
Malformed mushrooms with swollen stipes.
Reduced or deformed caps.
Undifferentiated tissue becomes necrotic and a wet, soft rot emits a bad odour.
An amber liquid appears on infected mushrooms.
Mushrooms become brown.
Bubbles may be as large as a grapefruit.
It is also a parasite of wild mushrooms.
It produces two spore types, one which is small and water-dispersed like Verticillium. the second which is a large resting spore capable of persisting for a long time in the environment.
Verwaltung:
Hygiene and sanitation in a growth house.
Clean surrounding.
Benomyl at the rate of 0.95 g/m².
Carbendazim and Thiabendazole at the rate of 0.62 g/m².
Bacterial diseases:
Bacterial spot / brown blotch:Pseudomonas tolaasii
Pale yellow spots on the surface of the piles later turn yellow.
In schweren Fällen, mushrooms are radially streaked.
Damage at storage and transit.
High humidity and watery conditions are favourable for disease.
Vector:Tyroglyphus mite.
Lesions on tissue that are pale yellow initially later become a golden yellow or rich chocolate brown.
The discolouration is superficial (not more than 2 to 3mm).
Verwaltung:
Hygiene and sanitation.
Low humidity.
Watering with an A1 50 ppm chlorine solution.
Viral diseases:
Virus (several)
Double-stranded RNA
Reduced cropping,
Bare patches on the beds,
Long-bent stalks with small caps,
Premature opening of mushrooms,
Stalks tapering towards the base of the stalk.
Verwaltung:
Farm hygiene.
Clean trays to prevent infection from old infected mycelia.
Maintaining 60°C temperature throughout the compost.
Advantages of Mushroom Farming:
Disadvantages of Mushroom Farming:
Abschluss:
The world mushroom industry has accelerated very rapidly in the last two decades by way of consisting of new types of mushrooms for commercial farming. Jedoch, mushroom as a vegetable has not located an ordinary area amongst Indian consumers. Despite a favourable agro-climate, an abundance of agricultural wastes, noticeably low-cost labour and wealthy fungal biodiversity, India has seen a lukewarm response in its growth. Zur Zeit, the whole mushroom manufacturing industry in India is around 0.13 million tonnes.
From 2010-2017, the mushroom industry in India has recorded a common increase charge of 4.3% per year. Of the total mushrooms produced, white button mushroom bills for 73%, observed through oyster mushroom (16%), paddy straw mushroom (7%) and milky mushroom (3%). Compared to other vegetables; The per capita consumption of mushrooms in India is low and information shows that it is much less than 100 grams per year.
In the 12 months 2016-2017, the Indian mushroom enterprise generated an income of Rs. 7282.26 lakhs by exporting 1054 quintals of white button mushroom in canned and frozen form. Considering the production figures, the demand for spawn in India is estimated to be around 8000-10000 tonnes per year. The majority of this business spawn is furnished to non-public producers and the contribution of public region corporations in spawn grants used to be constrained to only 10%. In diesem Artikel, we attempted to analyse the contemporary state of affairs of the mushroom industry with the assistance of AICRP community centres placed throughout the US and discuss the possibilities and challenges for the improvement of mushroom entrepreneurship in India.



Fanatischer Kundenservice während der Covid-19-Krise

Wintex - Modell 3000 - Automatischer Bodenprobenehmer
Umgang mit Schnecken:Die Geißel der Gärtner

6 Dinge, die alternde Landwirte heute für ihre Gesundheit und Sicherheit tun können

Wachsen und Pflegen von Zinnien, die komplette Anleitung
Neuer CEO von Pilgrim’s Pride
Schädlinge von Schlangenkürbis, Keimung von Schlangenkürbissamen
Square Foot Gardening Stangenbohnen (gut recherchierte Tipps)

Pflege von Aprikosenbäumen:Aprikosenbaum wächst im Hausgarten

Wann man Tomaten für den besten Geschmack und die beste Fruchtqualität pflücken sollte