Vollständiger Leitfaden zur Pilzzucht in Indien &Marktchancen
Überblick über Pilze und globaler Trend
* Einige Abschnitte in diesem Artikel sind zu lang. Bitte benutzen Sie das Inhaltsverzeichnis oben im Artikel, um zu dem Abschnitt zu springen, der Sie interessiert.
Pilzzucht/-zucht begann als Hobby, aber es ist ein vollwertiges, hochprofitabler Beruf/ Landwirtschaft . Die meisten Pilzsorten können in Räumen gezüchtet/gezüchtet werden, Schuppen, Garagen, Keller und kleine Lagerhallen.
Die kommerzielle Pilzzucht wurde Ende der 1960er Jahre in Indien eingeführt. als ein deutscher Landwirt mit einem indischen Landwirt in Solan zusammenarbeitete, eine Stadt im indischen Bundesstaat Himachal Pradesh, im Rahmen eines Programms namens „Entwicklung des Pilzanbaus in Himachal Pradesh“.
Dieser Artikel konzentriert sich darauf, Ihnen Informationen über Pilzarten zu geben, globaler und lokaler Pilzmarkt, globale und lokale Pilzproduktion zusammen mit Produktionsanteil, Techniken der Pilzzucht in Indien, einige der Krankheiten, die mit gezüchteten/gezüchteten Pilzen und Pilzsorten verbunden sind, die lokal zu kommerziellen Zwecken gezüchtet werden können. Bitte beachten Sie die Inhaltsverzeichnis Abschnitt, um direkt zu dem Thema zu springen, das Sie interessiert.
Unternehmer haben die Pilzzucht in großem Stil aufgenommen. Die Nachricht hat die Leute erreicht, dass Pilze einen nationalen und internationalen Markt haben.R N Verma, Direktor des Nationalen Zentrums für Pilzforschung und -ausbildung -NCMRT
Weltweiter Pilzkonsum im Vergleich zu Indien
Der Pilzkonsum in Indien ist im Vergleich zu vielen anderen Ländern, die Pilze konsumieren, sehr gering.
Schon seit, der Trend des Pilzkonsums hat in Indien eine sehr langsame Wachstumsrate verzeichnet, Der Anbau von Pilzen hat den weltweiten Trend nicht eingeholt.
Zur Zeit, Der Pilzverbrauch in Indien wird auf etwa 30-40 g geschätzt, verglichen mit 2-3 kg in den Vereinigten Staaten und Europa. Indien verbraucht etwa 90 Gramm Pilze pro Person, eine im Vergleich zu anderen Ländern relativ geringe Menge, darunter die USA mit 1,49 Kilogramm und China mit 1,16 Kilogramm.
Globale Pilzproduktion und Marktanteil
Der Pilzmarkt hatte im Jahr 2015 einen globalen Wert von 35 Milliarden US-Dollar. Im Zeitraum zwischen 2016 und 2021 der Markt soll um 9,2 Prozent wachsen. Als Ergebnis, bis 2021, der Markt wird voraussichtlich fast 60 Milliarden US-Dollar erreichen. Zu den führenden Pilzproduzenten zählen China, Die Vereinigten Staaten, die Niederlande, Polen, Spanien, Frankreich, Italien, Irland, Kanada und Großbritannien.
Land
2010
2011
2012
2013
2014
2015
2016
China
48, 26, 000
56, 58, 972
65, 27, 965
70, 68, 102
75, 91, 140
80, 26, 152
77, 86, 368
Italien
6, 84, 401
7, 61, 858
10, 16, 886
6, 04, 525
6, 00, 114
5, 94, 835
6, 83, 620
Vereinigte Staaten von Amerika
3, 59, 469
3, 90, 902
4, 02, 904
4, 08, 157
4, 32, 100
4, 29, 562
4, 19, 630
Niederlande
2, 66, 000
3, 04, 000
3, 07, 000
3, 23, 000
3, 10, 000
3, 10, 000
3, 00, 000
Polen
2, 30, 000
2, 20, 000
2, 28, 300
2, 37, 069
2, 45, 747
2, 52, 944
2, 60, 140
Spanien
1, 33, 000
1, 46, 100
1, 47, 440
1, 49, 700
1, 49, 854
2, 18, 795
1, 97, 010
Kanada
78, 452
84, 202
1, 37, 597
1, 32, 448
1, 34, 545
1, 18, 642
1, 33, 935
Frankreich
1, 19, 373
1, fünfzehn, 696
1, 16, 602
1, 04, 461
1, 08, 671
1, 01, 135
1, 01, 949
Vereinigtes Königreich
69, 300
70, 740
78, 580
85, 484
94, 857
1, 03, 197
99, 813
Irland
54, 500
57, 700
69, 600
67, 700
69, 600
72, 200
70, 000
Indien
40, 600
40, 600
30, 000
17, 000
28, 000
33, 699
29, 992
Republik Korea
26, 250
24, 787
26, 000
26, 771
26, 860
26, 292
26, 158
Alle anderen
53, 69, 166
62, 27, 659
70, 94, 714
76, 65, 730
82, 16, 306
86, 59, 997
84, 80, 171
Gesamtproduktion
1, 22, 56, 511
1, 41, 03, 216
1, 61, 83, 588
1, 68, 90, 147
1, 80, 07, 794
1, 89, 47, 450
1, 85, 88, 786
Zu den wichtigsten Pilzprodukten zählen Shiitake, Taste, Auster, und andere Produkte, die Paddy-Pilze enthalten, milchiger Pilz, Reishi-Pilz, und Winterpilze, Morchella-Arten und Tuber magatum.
Obwohl, die asiatischen Länder werden voraussichtlich am stärksten in der Pilzproduktion wachsen, Indien wächst in der Pilzzucht immer noch mit einer eher langsamen Rate von 4,3% pro Jahr.
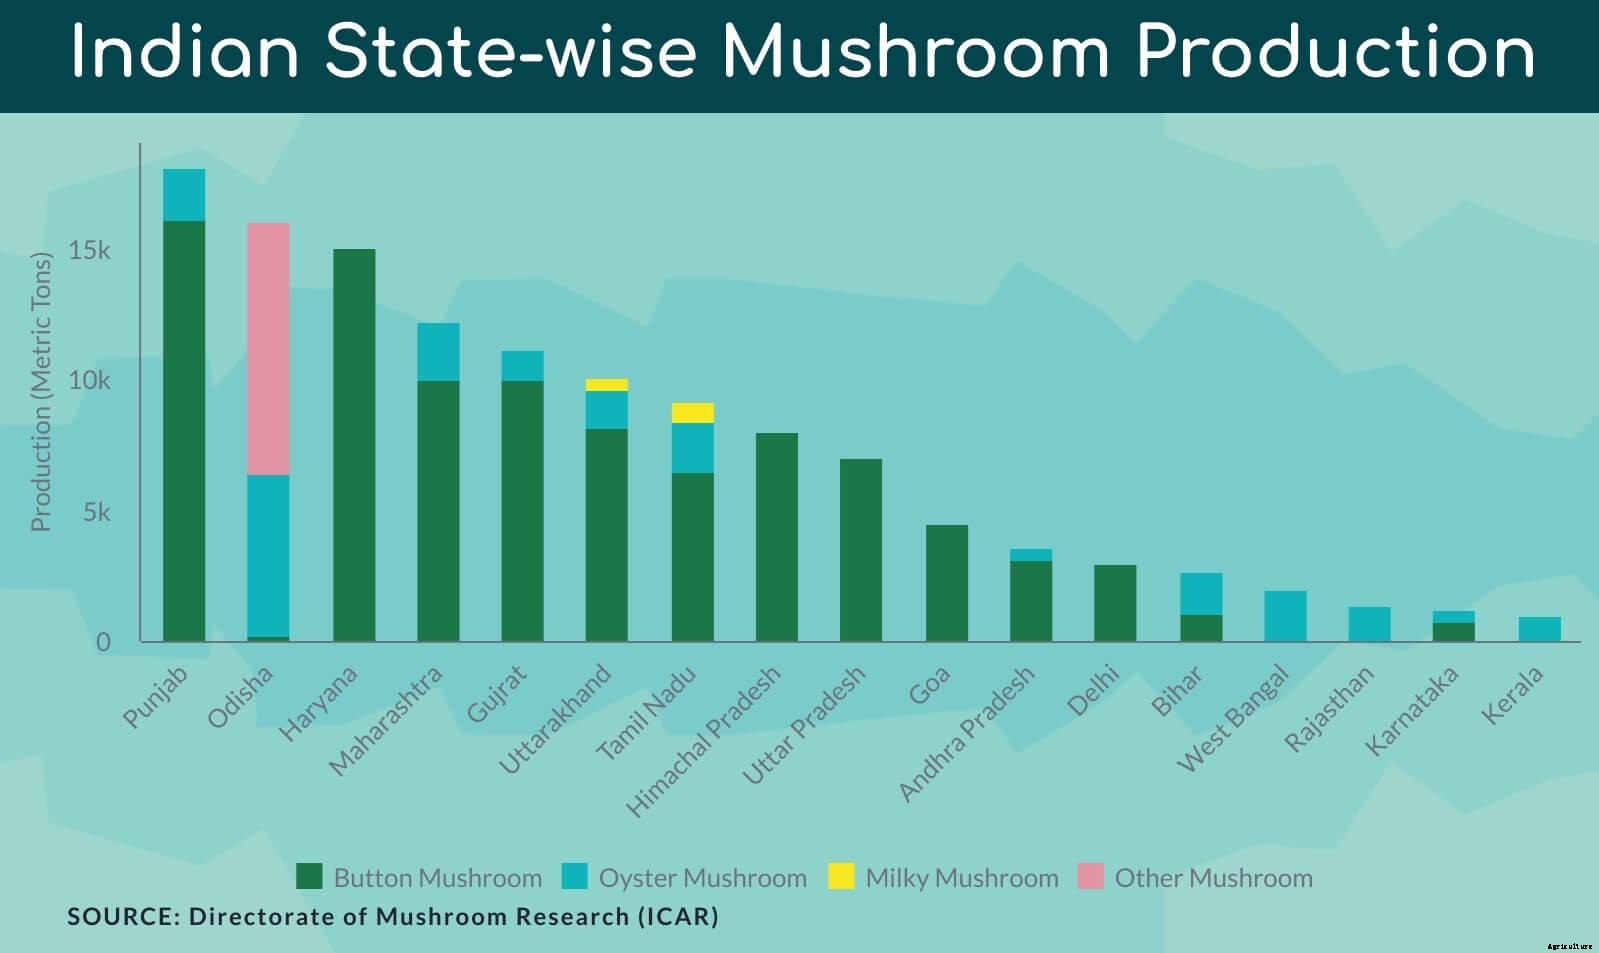
Indien exportiert 105,4 Tonnen weiße Champignons in Dosen und gefroren. Unter der weltweiten Pilzproduktion, Indiens Produktion von Champignons trägt 15% bei.
Insgesamt wurden zwischen 2010 und 2017 in Indien etwa 0,13 Millionen Tonnen Pilze durch die Pilzzucht erzeugt. Diese Zahl sieht groß aus, aber im Vergleich zu anderen Pilz produzierenden Ländern sieht es unbedeutend aus.
Da die Kosten für die Pilzzucht im Westen hoch steigen, Dies ist eine perfekte Gelegenheit für indische Bauern und Unternehmer, ernsthaft über die Pilzzucht in Indien nachzudenken.
Die Kosten für die Herstellung von Pilzen im Westen steigen aufgrund der hohen Arbeitskosten. Europäer und Amerikaner suchen zunehmend nach ihren Pilzen in China und Indien.B L Dhar, Leitender Wissenschaftler (NCMRT)
Pilzzucht in Indien :Produktion und Trend
Agaricus bisporus (weißer Champignon), Pleurotus spp. (Austern Pilz), Volvariella volvacea (Paddystrohpilz), und Calocybe indica – Milchpilze umfassen die wichtigsten in Indien angebauten Pilzsorten.
Pleurotus sajor-caju, Pleurotusflordia, Pleurotus flabellatus, Pleurotus eous, und Pleurotus florida sind die am häufigsten angebauten Pleurotus-Arten.
In tropischen und subtropischen Regionen, Austern, Reisstroh, und Milchpilze werden saisonal angebaut.
Ungefähr 73% der Champignons werden in Indien produziert und die Produktionssysteme sind sowohl saisonale Landwirtschaft als auch High-Tech.
Die Austernpilzproduktion macht 16% der Gesamtproduktion von Pilzen aus und 10, 000 Tonnen jährlich werden in Indien produziert. Orissa, Karnataka, Maharashtra, Andhra Pradesh, Madhya Pradesh, West Bengal, sowie Meghalaya, Tripura, Manipur, Mizoram, und Assam bauen in großen Mengen Austernpilze an.
Der erste einheimische Pilz, der in Indien kommerzialisiert wurde, ist der Calocybe Indiaca (Milchpilz).
Traditionell, der Shiitake-Pilz wurde in Indien auf Holzstämmen angebaut, künstliche Medien, Maiskolben, Sägespäne, Weizenkleie, und andere Zusatzstoffe. Der Anbau von Shiitake-Pilzen ist in Indien aufgrund nicht standardisierter Anbaumethoden vernachlässigbar und kaum erfolgreich.
Nährstoffgehalt von Pilzen
Pilze sind eine ausgezeichnete Quelle für lösliches Protein und Ballaststoffe, die eine wichtige Rolle für die menschliche Gesundheit spielen. Als relativ leicht verdauliches Protein (70-90%), Pilzprotein gilt als dem pflanzlichen Protein überlegen.
Die folgende Tabelle zeigt den Nährstoffgehalt pro 100 Gramm Pilz.
PILZARTEN
PROTEIN
FETT
KOHLENHYDRAT
FASER
ASCHE
ENERGIE KCAL
Auricularia Auricula
4.20
8.30
82,80
19.80
4.70
351.00
Agaricus Bisporus
33,48
3.10
46,17
20,90
5,70
499.00
Calocybe Indica
17.69
4.10
64,26
3.40
7,43
391.00
Flammulina Velutipes
17.60
1,90
73,10
3.70
7,40
378.00
Lentinula Edodes
32,93
3.73
47,60
28,80
5.20
387.00
Pleurotus Sajor-caju
19.23
2,70
63,40
48,60
6.32
412.00
Pleurotus Ostreatus
30.40
2.20
57,60
8.70
9,80
265.00
Volvariella Volvacea
37.50
2.60
54,80
5.50
1,10
305.00
In Indien, es gibt mehrere Heilpilze, einschließlich Ganoderma lucidum, Phellinus rimosus, und Pleurotus spp., die tiefe medizinische Eigenschaften besitzen.
Sechs Schritte der Pilzzucht
Der folgende Abschnitt des Artikels beschreibt die Schritte Diese Schritte sind im Wesentlichen in zwei Phasen unterteilt. Diese Schritte umfassen den Anbauprozess, der von der Herstellung des Komposts für Pilze bis zum Ernten der Pilze beginnt.
Phase I
Schritt 1. Kompost vorbereiten
In erster Linie, Die Kompostierung erfolgt im Freien. Jedoch, es kann auch in einem Gehege mit Schuppen durchgeführt werden.
Ein Kai, Zur Herstellung des Komposts wird eine Konstruktion aus Beton verwendet.
Haufen von Kompostmaterial können manuell gemischt werden oder mit Hilfe eines Kompostwenders.
Es gibt zwei Arten von Kompost:Natürlicher Kompost (Hauptbestandteil ist Pferdemist) und synthetischer Kompost (Heu, zerkleinerter Maiskolben, Hartholz Rinde, Baumwollsamenschalen, Kakaobohnenschalen, Bananen-Pseudostängel, Abfälle aus Baumwollfabriken, Wasserhyazinthe, neutralisierter Traubentrester, alte zerfetzte Zeitung, Harnstoff, Kalzium, etc.)
Beide Kompostarten benötigen eine zusätzliche Ergänzung mit Stickstoff und Gips.
Wenn der Kompost gewendet wird, es wird benetzt (mit Wasser besprüht), um den Kompost ausreichend zu vermischen. In diesem Schritt werden auch Stickstoffzusatz und Gips hinzugefügt.
Das Nebenprodukt dieses Prozesses ist Wärme, Kohlendioxid und Ammoniak. Die am besten geeignete Nahrungsquelle für Pilze im Kompost wird durch Hitze freisetzende chemische Reaktionen und Mikroorganismen im Kompost geschaffen.
Ausreichend Feuchtigkeit, Sauerstoff, Stickstoff und Kohlenhydrate müssen während des gesamten Prozesses vorhanden sein, sonst wird die Kompostierung gestoppt.
Die Zugabe von Gips bringt viele Vorteile. Gips hilft den Chemikalien, die dem Kompost zugesetzt werden, auf den Strohhalmen oder Heu auszuflocken. Es reduziert auch die Fettigkeit des Komposts. Es hilft bei der Belüftung des Komposts, was wiederum das Risiko der Entwicklung von Chemikalien minimiert, die das gute Wachstum von Pilzen im Kompost behindern.
Es wird empfohlen, 20 kg Gips pro Tonne in den Kompost zu geben.
Dem Kompost wird Stickstoffzusatz zugesetzt, um den Stickstoffgehalt des natürlichen Komposts auf 1,5 Prozent oder des synthetischen Komposts auf 1,7 Prozent zu erhöhen.
Stickstoffergänzungen wie Samenmehle von Sojabohnen, Baumwolle oder Erdnuss- und Hühnermist verwendet werden.
Synthetischer Kompost erfordert auch die Zugabe von Ammoniumnitrat oder Harnstoff.
Die Pfahlhöhe muss auf der Betonplatte 5 bis 6 Fuß betragen. Eine erhöhte Betonplatte ist ratsam, um Wassereinlagerungen durch eine gute Drainage zu vermeiden. Halten Sie den Flor steif und dicht von den Seiten, aber locker von der Mitte, um eine gute Belüftung zu gewährleisten.
Die optimale Komposttemperatur beträgt 60 bis 80 Grad Celsius. Die Abstände zwischen der Anzahl der Kompostumdrehungen hängen von der Temperatur und dem Zustand des Kompostmaterials ab.
Das Gleichgewicht der Wasserzugabe zum Kompost sollte jederzeit aufrechterhalten werden. Weniger Wasser führt dazu, dass die Nahrungsproduktion für Pilze eingestellt wird und überschüssiges Wasser führt dazu, dass die Belüftung unterbrochen wird. Ein gutes Gleichgewicht der mikrobiellen Aktivität, Nährwert, Wasser, und Temperatur sind alle notwendig und ein Ungleichgewicht auch nur einer Komponente kann die Qualität des Komposts beeinträchtigen.
Die Kompostierung dauert ein bis zwei Wochen, je nach Beschaffenheit des Kompostmaterials und Wenden.
Der wünschenswerte Kompost sollte weiche, biegsame Strohhalme; starker Ammoniakgeruch; Temperatur von fast 75 Grad Celsius oder mehr; schokoladenbraune Farbe; und Feuchtigkeitsgehalt von 68 bis 74 Prozent.
Phase II
Schritt 2. Kompost einstellen
Dieser Schritt dient der Pasteurisierung des Komposts, um Insekten zu beseitigen, Schädlingspilze und Nematoden. Es ist auch notwendig, Ammoniak zu entfernen. Der Ammoniakanteil sollte weniger als 0,07 betragen.
Es gibt drei Arten von Methoden, die für diesen Schritt verwendet werden. Kompost wird in Räumen mit kontrollierter optimaler Umgebung platziert.
Holzschalenmethode:Kompost wird in Holzschalen verpackt und übereinander gestapelt.
Bettsystemmethode:Kompost wird über die Betten in den Räumen mit kontrollierter Umgebung verteilt.
Bulk-System-Methode:Der Kompost wird auf gelochten Zementblockbehältern aufgeschüttet.
Deammonisierende Organismen unter geeigneten Bedingungen verwenden Kohlenhydrate und Stickstoff und entfernen somit überschüssiges Ammoniak aus dem Kompost.
Allgemein, Für diesen Schritt werden zwei Arten von kontrollierten Umgebungen verwendet:
Umgebung mit niedriger Temperatur:Die Temperatur des Komposts wird auf 52 Grad Celsius erhöht. Danach wird die Temperatur um ca. 1 Grad Celsius abgesenkt, bis der Ammoniakgeruch vollständig verschwunden ist.
Hochtemperaturumgebung:Die Temperatur des Komposts wird für etwa 6 bis 8 Stunden auf 63 Grad Celsius erhöht. Dies kann durch Einspritzen von Dampf in den Kompost erfolgen. Und dann wird die Temperatur auf 60 Grad Celsius reduziert. Danach, Der Kompost wird täglich auf eine Temperatur von 1 bis 2 Grad auf natürliche Weise abkühlen gelassen, bis der Ammoniakgehalt auf das gewünschte Niveau gesenkt ist.
Die optimale Komposttemperatur beträgt 24 bis 27 Grad Celsius. Die Feuchtigkeit sollte zwischen 68 und 72 Prozent liegen und der Stickstoffgehalt sollte 2 bis 2,4 Prozent betragen. 2,5 bis 3,2 kg Kompost pro Quadratfuß der Schale sind ratsam, um die Pilzproduktion/-ausbeute zu maximieren.
Schritt 3. Ablaichen/Aussäen des Pilzmyzels
In der Natur, Pilze werden durch mikroskopisch kleine Sporen von unterhalb der Pilzkappe vermehrt. Aber diese Sporen können nicht wie Samen zur Aussaat in den Kompost gehandhabt werden.
Somit, Pilze werden mit Myzel gepflanzt, ein dünner Faden wie eine Pilzzelle.
Vegetativ vermehrtes Myzel wird als Laich bezeichnet.
Traditionell wurden die Laichen von Hand mit dem Kompost vermischt.
Im modernen Schalensystem, Der Laich wird in den Kompost gemischt, während sich die Schalen durch das Förderband bewegen.
Im Bettsystem, Spawn wird mit Kompost mit Laichmaschinen gemischt, die kleine Finger wie Texturen haben.
In der kontrollierten Umgebung wird eine Temperatur von 24 Grad Celsius gehalten. Das Myzel aus den Laichen verbindet sich und bildet eine weiße Masse auf dem Kompost. Die Aufrechterhaltung einer konstanten Temperatur ist sehr wichtig, da eine hohe Temperatur das Myzel abtötet und eine niedrige Temperatur das Wachstum des Myzels verlangsamt.
Schritt 4:Gehäuse
Zur Bildung von Pilzen wird eine Top-Dressing-Erde auf den Kompost aufgetragen. Dieser Schritt wird als Gehäuse bezeichnet.
Eine Mischung aus Kalkstein und Torfmoos, zurückgewonnener Kompost, Kuhdung mit Gartenerde, oder Ton-Lehm-Erde sind eine gute Option für die Ummantelung des Komposts.
Wenn Myzel miteinander verschmilzt, es bildet eine dicke schnurartige Struktur, die Rhizomorphs genannt wird. Diese Rhizomorphe wachsen zu Pilzen.
Die Hülle sollte vor der Anwendung immer pasteurisiert werden, um Insekten oder Krankheitserreger abzutöten.
Die Hülle muss gleichmäßig und mit der richtigen Tiefe auf den Kompost aufgetragen werden. Damit die Laichen in gesunde Pilze eindringen und über die Hülle hinaus wachsen können.
Der Kompost sollte in einer kontrollierten Umgebung mit guter Luftfeuchtigkeit und einer Temperatur von 24 Grad Celsius gelagert werden.
Die Komposttemperatur sollte täglich um ca. 1 Grad Celsius gesenkt werden, bis kleine Pilze aus dem Kompost sprießen.
Das Auftragen von Wasser nach der Karkasse ist eine hohe Kunst, die ein Züchter nach dem Sammeln von Erfahrung erlernen wird.
Schritt 5:Anheften
Nach dem Gehäuse, ein Auswuchs der Rhizomorphen ist gleichmäßig im gesamten Kompostbett zu sehen. Diese Auswüchse werden als „initial“ bezeichnet.
Wenn die „Initiale“ größer wird (ungefähr viermal so groß wie eine „Initiale“), es heißt "Pin".
In knapp 3 Wochen, Diese Stifte werden zu erntbaren Pilzen heranwachsen.
Stellen Sie sicher, dass der Kohlendioxidgehalt in der Luft 0,08 Prozent oder weniger beträgt.
Die Senkung des Kohlendioxidgehalts erfolgt durch Einleiten von Frischluft in das System.
Der beste Zeitpunkt, um frische Luft einzuführen, kann der Zeitpunkt sein, zu dem das Myzel aus der Gehäuseoberfläche austreten kann.
Eine frühzeitige Reduzierung des Kohlendioxidgehalts kann zu einem langsamen Myzelwachstum führen. Die Pilze könnten unter der Oberfläche des Gehäuses wachsen, was zu schmutzigen Pilzen führt.
Der Pinning-Schritt ist sehr wichtig, da er den Ertrag und die Qualität der Pilze bestimmt.
Schritt 6:Zuschneiden
Die Ernte des Pilzes hängt von der Qualität und dem Wachstumsstadium des Pilzes ab.
Zum Beispiel, in einigen Teilen der Welt wie Nordamerika, Kunden bevorzugen einen Pilz mit einem dicht geschlossenen Schleier. Wohingegen, in einigen Teilen der Welt wie Europa, Kunden bevorzugen Pilze mit größeren länglichen Schleiern.
Die Pilzernte besteht aus Ernte-/Erntezyklen, die sich normalerweise in einem 3- bis 5-Tage-Zyklus erstrecken. Diese Erntezyklen werden als Blüte bezeichnet, spülen oder brechen.
Verschiedene Landwirte folgen je nach Markt und Kundenanforderungen unterschiedlichen Anbaumustern. Einige Landwirte können Pilze bereits nach 30 Tagen ernten und auf der anderen Seite Einige Landwirte könnten die Erntezeit auf 150 Tage verlängern.
Je nach Pilzart, das Pflücken des Pilzes für die Ernte kann unterschiedlich sein.
*Muss gelesen werden : 8 Bodenarten Indiens und Bodenverteilung in Indien
Leitfaden für verschiedene Pilzzucht in Indien
Nachdem wir nun die allgemeinen Faustregeln für die Pilzzucht besprochen haben, Lassen Sie uns einen Blick auf die Anbautechniken und Empfehlungen für verschiedene Pilzzucht in Indien werfen.
Lassen Sie uns die Grundlagen und die üblichen Verfahren aus dem Weg räumen, bevor wir uns mit der Zucht verschiedener Pilze vertraut machen.
Erster und zweiter Schritt der Pilzzucht, d.h. Kompostierung und Veredelung der Kompostierung sind für alle Pilze wie Knopf-, milchig, Reisstroh, Auster, Reishi und Shiitake.
Wie bereits weiter oben im Artikel (in sechs Schritten für die Pilzzucht) besprochen, gibt es zwei Arten von Kompost:Synthetischer Kompost und Natürlicher Kompost.
Synthetischer Kompost für die Pilzzucht
Wie der Name schon sagt, es leitet die Nährstoffe aus synthetisch hergestellten Bestandteilen wie Harnstoff, Gips und Calciumammoniumnitrat oder Ammoniumsulfat.
Das Heustroh wird in der Länge von 8 bis 20 cm lang geschnitten und gleichmäßig über ein Mischbett verteilt und gleichmäßig mit Wasser bewässert.
Nehmen wir die Schalengröße von 1 Meter x 0,5 Meter x 0,15 Meter für die Kultivierung von Pilzen an. Ebenfalls, Nehmen wir an, wir werden 15 solcher Schalen für die Pilzzucht verwenden. Benötigte Zutaten:
ERFORDERLICHE ZUTATEN
BENOETIGTE MENGE
Weizenstroh
250 kg
Harnstoff
3 kg
Gips
20 kg
Reis/Weizenkleie
20 kg
Ammoniumsulfat/Calciumammoniumnitrat
3 kg
*Muss gelesen werden : Vollständige Anleitung zu den Arten von Düngemitteln:Ihre Klassifizierung und Verwendung
Ein Haufen wird hergestellt, indem alle Zutaten außer Gips gemischt werden.
Die Florhöhe kann von 1 Meter bis 2 Meter variieren. Nehmen wir eine Pfahlhöhe von 1 Meter bei einer Breite von 1 Meter an.
Der Flor sollte eine feste und dichte Außenseite, aber eine weiche Mitte haben, damit die Belüftung richtig erfolgen kann.
Wie bereits erwähnt, Der Vorgang des Öffnens und erneuten Mischens des Komposts wird als „Wenden“ bezeichnet. Die Anzahl der Wendevorgänge hängt vom Zustand der Zutaten und vom Klima ab. Unterschiedliche Landwirte haben unterschiedliche Regelungen zum Wenden.
Das Einschalten ist möglich auf:
TAG
DREHENMANAGEMENT
1. Tag
Wenden ohne Ergänzung zum Kompost
4. Tag
Wenden ohne Ergänzung zum Kompost
8. Tag
Wenden ohne Ergänzung zum Kompost
12. Tag
Mitdrehen unter Zugabe von 10 kg Gips
16. Tag
Mitdrehen und weitere 10 kg Gips hinzufügen
20. Tag
Wenden und ebenfalls 10 ml (Malathion, PUNKT, Lindan, BHC) in 5 Liter Wasser
Hühnermist hat höhere Nährstoffgehalte wie Stickstoff (4,55 bis 5,46 %), Phosphor (2,46 bis 2,82 %), Kalium (2,02 bis 2,32 %), Kalzium (4,52 bis 8,15 %), Magnesium (0,52 bis 0,73 %). Wenn möglich, können Sie dem Kompost auch 60 kg Hühnermist hinzufügen.
Natürlicher Kompost für die Pilzzucht
Wie der Name schon sagt, Dieser Kompost wird aus natürlichen Zutaten hergestellt.
Wieder, Nehmen wir die Schalengröße von 1 Meter x 0,5 Meter x 0,15 Meter für die Kultivierung von Pilzen an. Ebenfalls, Nehmen wir an, wir werden 15 solcher Schalen für die Pilzzucht verwenden. Benötigte Zutaten:
ERFORDERLICHE ZUTATEN
BENOETIGTE MENGE
Geflügelmist
100 kg
Weizenstroh
350 kg
Pferdemist
1000 kg
Gips
25 kg
Die Zutaten werden auf dem Kompostplatz gemischt und mit Wasser benetzt.
Ein Komposthaufen wird hergestellt und beobachtet, bis er anfängt, Ammoniak zu riechen.
Der Komposthaufen wird alle 4 Tage gewendet und in 3
rd
und 4
NS
Pro Tonne Kompost werden 25 kg Gips zugesetzt.
In der letzten Runde können Sie 10 ml Malathion hinzufügen, PUNKT, Lindan oder BHC in 5 Liter Wasser zum Kompost.
* Muss gelesen werden : Vollständige Anleitung zu den Arten von Düngemitteln:Ihre Klassifizierung und Verwendung
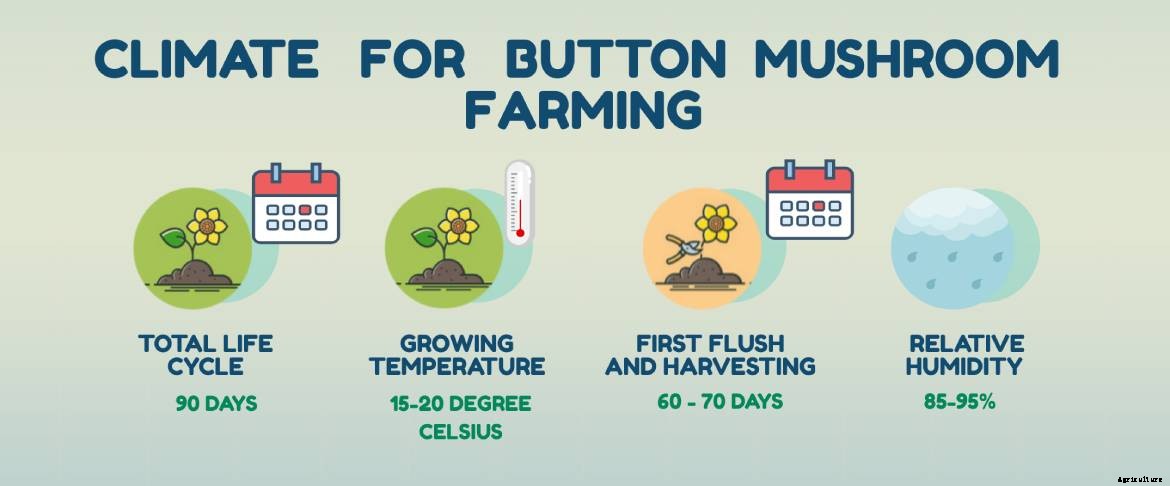
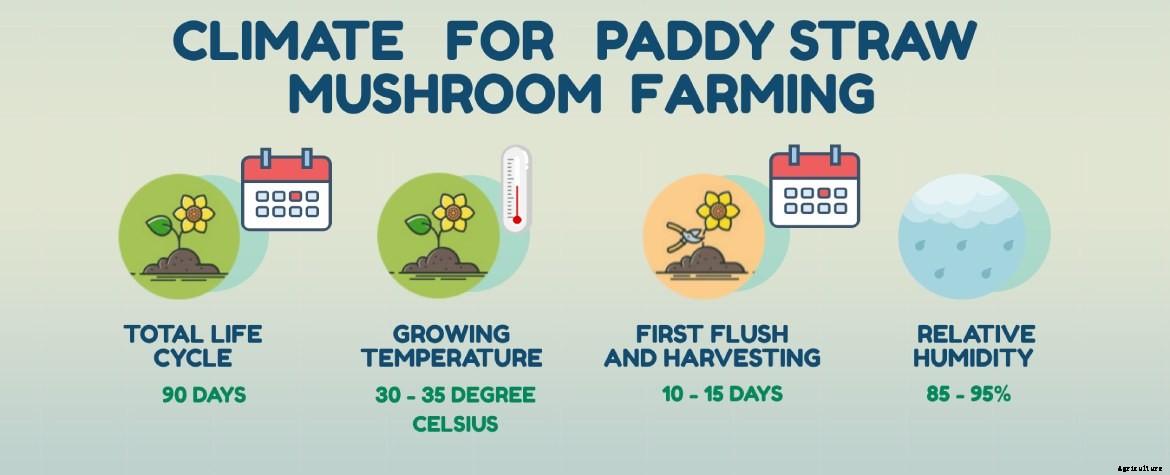
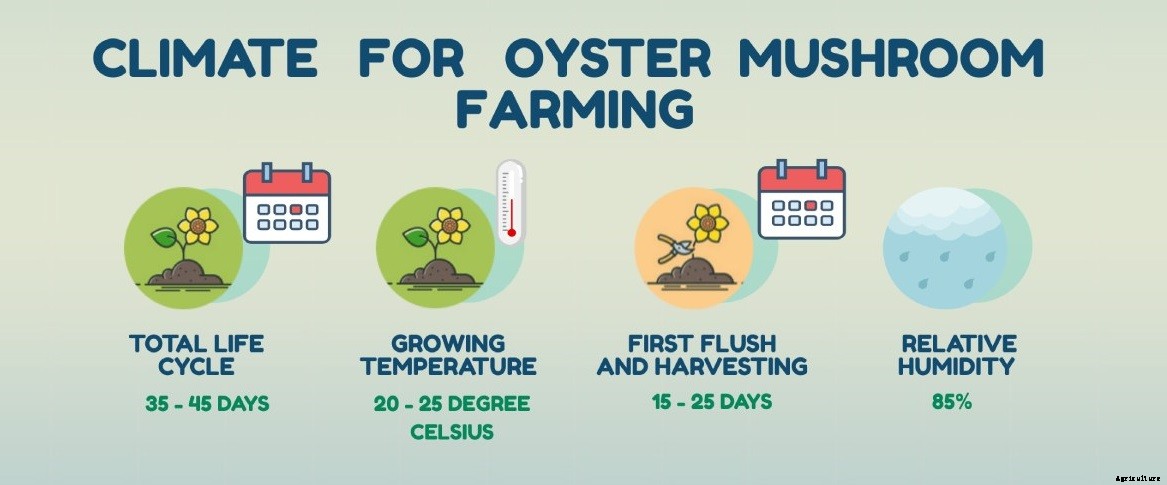
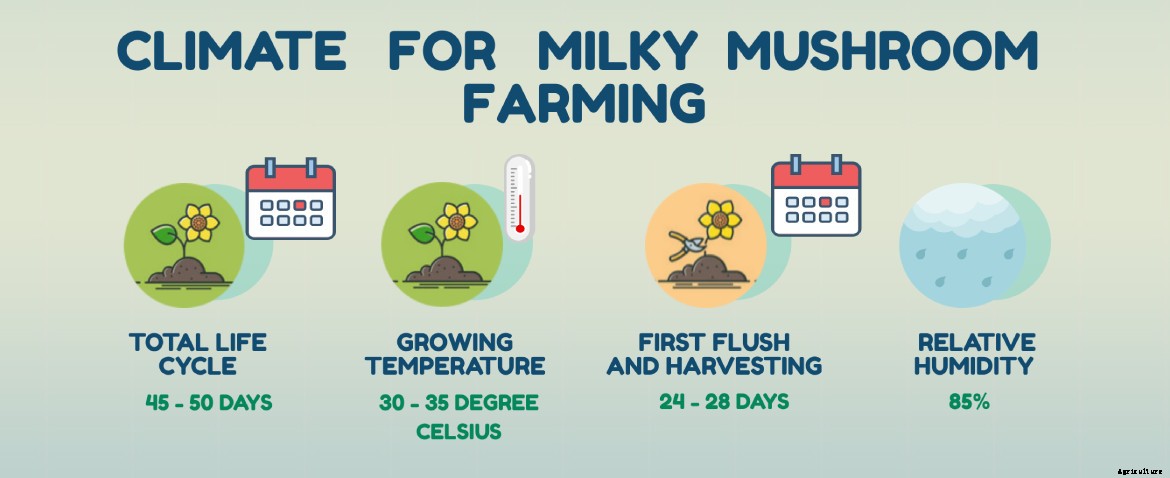
Klimatische Bedingungen für die Pilzzucht in Indien
Die folgende Tabelle listet die klimatischen Bedingungen auf, Lagerbedingungen, erste Flush-Details, Ertrag und ungefähre Kalkulation von Champignons, Austern Pilz, Pady Stroh Pilze und Milchpilze, die in Indien angebaut werden.
EIGENSCHAFTEN
TASTE PILZ
AUSTERN PILZ
PADDY STROHPILZ
MILCHPILZ
SPEZIES
Agaricus Spp
Pleurotus Spp
Volveriella Spp
Calocybe Indica
SUBSTRAT
Kompost
Paddy-Stroh
Paddy-Stroh
Paddy-Stroh
WACHSENDE TEMPERATUR
15-20°C
20-25°C
30-35°C
30-35°C
RLATIVE FEUCHTIGKEIT
85-95%
85%
85-95%
85%
GESAMTER LEBENSZYKLUS
90 Tage
35-45 Tage
90 Tage
45 - 50 Tage
ERSTES SPÜLEN UND ERNTEN
60 -70 Tage
15 - 25 Tage
10 - 15 Tage
24 - 28 Tage
ERTRAG
800-900 Gramm / Bett (4 Kilo Gramm Kompost)
635 Gramm (500 Gramm Paddy-Stroh)
800-900 Gramm / Bett (4 Kilo Gramm Kompost)
700 Gramm (500 Gramm Paddy-Stroh)
HALTBARKEIT (RAUMTEMP.)
2 Tage
2 Tage
1 Tag
3 Tage
HALTBARKEIT (GEKÜHLT)
3 Tage
3 Tage
2 Tage
5 - 7 Tage
PROTEIN
23,90%
23,60%
23,90%
32%
PRODUKTIONSKOSTEN
120* INR
80* INR
60* INR
70* INR
*Die in der Tabelle genannten Preise können von Bundesland zu Bundesland variieren.
Leitfaden für die Champignonzucht in Indien
Nach Phase I und Phase II der Kompostherstellung und Pasteurisierung von Kompost, Wir können mit dem Laichen und der Kultivierung der Pilze beginnen.
Kompost für Champignons schalen
Die in dieser Anleitung angenommene Größe des Tabletts beträgt 1 Meter x 0,5 Meter x 0,15 Meter.
Kompost wird in die Schale mit einer Tiefe von 15-18 cm gefüllt.
Der Kompost sollte nur an der Oberfläche leicht zusammengedrückt werden.
Achten Sie beim Übereinanderstapeln auf ausreichenden Abstand zwischen den Schalen. Ein Abstand von 15 cm ist empfehlenswert.
Ablaichen von Champignons
Das Mischen von Laichen mit dem Kompost wird Laichen genannt.
Es gibt verschiedene Laichtechniken, die verwendet werden:
Punktlaichen:In den Kompost wird ein 5 cm tiefes Loch gebohrt und Laichklumpen werden in das Loch gelegt. Der Brutabstand beträgt 20-25 cm. die Löcher werden später mit Kompost bedeckt.
Oberflächenlaichen:Die Laichen werden gleichmäßig über den Kompost geschichtet und in einer Tiefe von 3-5 cm gemischt. später wird die Oberseite mit einer dünnen Schicht Kompost bedeckt.
Lagenlaichen:3 bis 4 Lagen Laich werden mit Kompost vermischt, und später mit einer dünnen Kompostschicht bedeckt.
Der Laich wird mit dem Kompost in einer Menge von 7,5 ml/kg oder 500-700 Gramm / 100 kg Kompost vermischt.
500 Gramm Spawn reichen für 5 Standard-Tabletts.
Die Schalen werden nach dem Laichen gestapelt.
There must be a spacing of 1 meter from the ceiling and the topmost tray.
Spawn running of button mushrooms
The spawned compost is now covered with newspaper or plastic sheets.
The fungal thread will take 12 – 14 days to colonize the entire compost.
The temperature maintained in the cropping room is 24±2 degrees Celsius.
Relative humidity should be around 90%. The floor and the walls of the room can be watered to raise humidity if needed.
Higher carbon dioxide concentration in the air added benefits in this stage of mushroom farming.
Casing of button mushrooms
After spawn run completion, the compost bed should be covered by casing of about 3-4 cm thick.
The casing should be porous, should be able to hold water and should have a pH level of 7 – 7.5.
Peat moss is considered as best casing material.
Mixture of garden loam soil and sand (4:1), spent compost (2–3-year-old), cow dung and loam soil (1:1); burnt rice husk, sand and lime are commonly used casing materials.
The casing has to be posturized before application. For pasteurization you can steam the soil or use formaldehyde (2%) and bavistin (75 ppm).
Casing pasteurization should be done at least 10 days before its use in the compost.
After application of casing the temperature is maintained for 24±2 degrees Celsius and relative humidity of 85-90% is maintained.
Fruiting of button mushroom
The temperature is slowly reduced every day by almost 1 degree Celsius until it reaches 18 degrees Celsius.
The cabon dioxide level in the air is lowered to 0.08-0.15% by ventilating the room.
The “initials” will start merging to form pinheads, eventually moving into button forming stage.
Harvesting of button mushroom
First flush, bloom or break appears after almost 3 weeks of casing or 5 to 6 weeks of spawning.
It is very important to layer the casing properly as if it too thick, the musrooms will come out as dirty.
Harvesting is done in button stage when the caps/veils measure 2.5 to 4 cm.
The mushrooms should be harvested by lightly twisting the stem without disturbing the casing soil.
The gaps after harvesting should be again filled with casing soil and watered.
Yield of button mushroom
Per tray you can expect 3 to 6 kg of mushrooms depending on the precise care and maintenance given in every individual stage of mushroom farming
18-20 kg per 100 kg of compost is a desirable crop yield of 2 months old culture.
Storage of button mushrooms
Long term storage:
Canning is the most preferred storage technique. This makes it easy for export.
Apart from canning, freeze drying, pickling and IQF are also some practices followed.
Button mushrooms are not usually dried unlike oyster, shitake or paddy mushrooms.
Short term storage:
Mushrooms are highly perishable commodities and hence should be transferred to a cold room as soon as they are harvested.
Button mushrooms can be stored in 4-5 degrees Celsius for 3-4 days.
Button mushrooms should not be washed. But in case washing is required, a mix of 10 liters of water with 5-gram Potassium metabisulphite must be used to remove dirt.
Modified atmosphere packaging or controlled atmosphere packaging is also used in some places.
Guide to paddy straw mushroom farming in India
One of the oldest and commonly used techniques of mushroom farming is paddy straw mushroom farming. It’s an edible mushroom of the tropics and subtropics.
Andhra Pradesh, Kerala, Orissa, Tamil Nadu and west Bengal are the states producing paddy straw mushrooms in India. But since the yield (10-15% of dry substrate) of this cultivation technique is low, the overall yield from these states is also very low.
Indoor Cultivation Technology has increased the yield (35-40% biological efficiency) of paddy straw mushrooms and has brought paddy straw mushroom cultivation at semi-industrialized status.
The indoor cultivation method of paddy straw mushroom has following components and steps:
Substrate for paddy straw mushrooms
Paddy straw
Cotton waste is more preferable option of paddy straw.
Since cotton waste has more cellulose and hemi-cellulose, it can retain more moisture and eliminates the need of water in later stages of cropping.
This also helps in minimizing the risk of damaging the primordia.
Preparing the compost for paddy straw mushrooms
The substrate such as paddy straw or cotton ginning mill waste or a mix of paddy straw and cotton ginning mill waste with a ration of 1:1 is wetted for the first 2 days.
5% Poultry manure is added to the pile of dimensions 1.5meter high x 1.5meter wide.
However, nothing will be added to cotton ginning mill waste.
The compost is turned twice in two days (1 turning each day)
On the third turning, 1.5% calcium carbonate is added to the compost and is left for fermentation for the next 2-3 days.
Pasteurization and bedding for paddy straw mushrooms
The compost is spread on shelves or beds after outdoor composting for almost 3-4 days.
The thickness of the beds is dictated by the season in which the cultivation is being done. The thickness of the bed ranges from 5cm to 10cm.
In summers less thickness of the bed is preferred.
The compost is spread evenly and after 12 hours the compost is subjected to steam.
A temperature of 60 degrees Celsius is maintained for 4-5 hours for cotton waste compost and a temperature of 65 degrees Celsius is maintained for almost 6 hours for paddy straw compost. This method posturizes the compost.
The compost is then kept at a temperature of 50 degrees Celsius for the next 36 hours and then it’s allowed to cool naturally.
Spawning of paddy straw mushrooms
The spawning process can be started when the compost cools down to a temperature of 35 degrees Celsius.
Spawns of paddy straw mushrooms are called grain spawns as they are made of grains of cereals or millets.
Spawns made of soaked paddy stray are called straw spawns.
The compost is spawned with fresh spawn @ 1.5% (dry weight) or 0.4% (wet weight) basis of the compost.
The spawns are inserted 2 to 2.5 cm deep in the compost with a spacing of 12 to 15 cm.
The bed of compost is covered with thin plastic sheet after covering the spawns with compost.
Spawn running of paddy straw mushrooms
A fixed temperature of 32 to 34 degrees Celsius is maintained for the spwan run.
This temperature is ideal for colonization of the compost.
Cotton waste compost takes 4-5 days to colonize whereas paddy straw compost takes 5-6 days for colonization.
Crop management and fructification of paddy straw mushrooms
In the stage of spawn running, make sure there is adequate ventilation.
Water and light are not necessary.
After 4 days, you can add fluorescent lights in the room.
The plastic sheets used to cover the compost in spawning step are now removed on the 5
NS
day and water is gently sprayed over the beds.
The pinhead starts emerging on 5-6
NS
day of spawning.
Harvesting of paddy straw mushrooms
The first bloom or break or flush of paddy straw mushrooms can be seen after 4 to 5 days of pinhead formation.
Relative humidity of 80%, temperature of 30 degrees Celsius, regular fresh air and fluorescent lights can significantly increase the yield.
Mushrooms can be harvested as early as when the volva just breaks and reveals the mushroom.
This mushroom grows very fast and hence sometimes it is harvested twice or thrice a day.
The first flush constitutes 70 – 90% of the total mushroom yield.
Harvesting should be done by gently lifting, shaking and slightly twisting the mushroom from the bed.
Reframing from cutting the mushrooms using tools while harvesting. The stalk left behind in the bed might result in infestation of pests and lead to decreased yield.
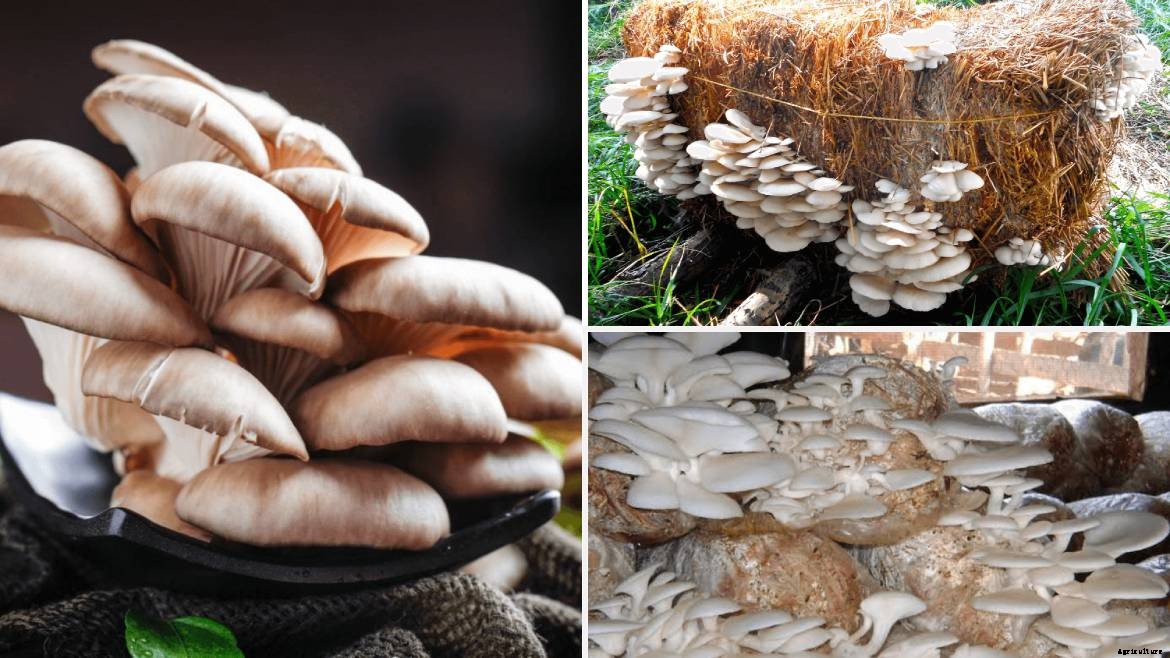
Guide to Oyster/ Dhingri mushroom farming in India
Technology used for the cultivation of the culinary and medicinal mushroom Pleurotus Spp. Often regarded as an oyster mushroom, has been standardized on locally available substrates.
The cultivation of pink, grau, Weiß, Gelb, brown, and black oyster mushrooms is the same; there are only minor differences in the duration of spawn running and cropping.
Oyster mushrooms are easy to grow. Zur Zeit, it is very popular in many countries, particularly in South-East Asia, where cultivation of button mushrooms is not feasible under natural climatic conditions.
Substrate for oyster mushroom cultivation
Substrate for oyster mushroom cultivation can be all kinds of cellulosic farm wastes.
Banana pseudo stems, cotton ginning mill waste, leaves of maize, used citronella leaf, sugarcane bagasse, Sägespäne, jute, used tea leaf waste, synthetic compost of button mushrooms, paper mill sludges, coffee byproducts, tobacco waste, cereal straw and waste paper are some of the substrate options.
Paddy straw is the most commonly used substrate.
Compost preparation for oyster mushroom cultivation
The substrate is chopped into 1 to 2 cm long pieces, and soaked in water for 2 to 3 hours.
Pasteurization of the substrate depends on the level in which farming is being done.
Small scale production:soaked in hot water at 80 degrees Celsius for 2 hours
Semi- commercial production:Steamed at a temperature of 80 degrees Celsius in steam chamber.
Full-fledged commercial production:substrate is subjected to 121 degrees Celsius temperature with 15-pound op pressure for 15 minutes in an autoclave.
Spawning of oyster mushroom
The pasteurized substrate is brought to a temperature of 65 degrees Celsius and is packed in polypropylene bags.
The bags are plugged with non-absorbent cotton.
The bags are filled 2/3 with the substrate and 1/3 with air.
40 grams of grain spawn can be mixed with 1 kg of substrate.
Spawn running of oyster mushroom
The polypropylene bags are then put in a dark room with a temperature of 24-28 degrees Celsius for 18-30 days.
The number of days can differ depending on the variety of the oyster mushroom being farmed.
Crop management and fructification of oyster mushroom
After the designated number of days, the bags are then moved to a cropping room.
Holes are made on the polypropylene bag. The holes can be of 2 cm in diameter with a spacing of 4 cm.
Pinhead will start emerging from the openings within 2 to 7 days depending on the variety.
The adequate temperature ranges from 13-30 degrees Celsius and relative humidity ranges from 80 to 85%, depending on the variety of the oyster mushroom.
In almost 2 weeks the substrate inside the bags become compact. At this point you can cut the bags and place the compact substrates on shelves.
Harvesting of oyster mushroom
Harvestable crop will appear in almost 3 weeks.
The compact substrate cylinders now have a growth of oyster mushrooms on the outside.
The best time to harvest the oyster mushrooms is when the cap starts folding.
The fist flush can appear in 18-20 days and the subsequent second and third flush can appear in an interval of 7 days.
You can cut the oyster mushrooms with a tool or pluck it from the substrate gently by twisting.
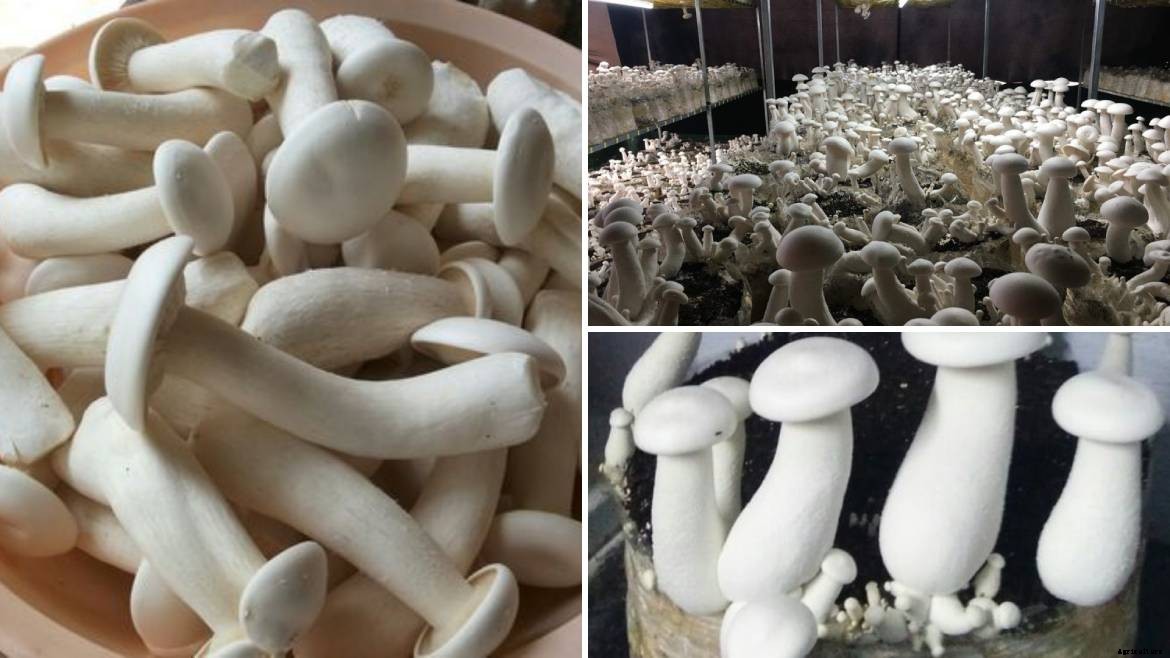
Guide to Milky mushroom farming in India
Milky mushrooms are named so because they are milky white in colour. It is the only species of mushroom that is indigenous to, and cultivated in, the hot, moist climate of India.
It is also known as “Swetha” mushroom or “summer” mushroom. It’s a tropical mushroom which can grow to be quite long and thick.
Karnataka, Tamil Nadu, Kerala, Odisha and Andhra Pradesh are the states in India having suitable climatic conditions to growth of milky mushrooms.
Substrate for milky mushrooms
Banana pseudo stems, cotton ginning mill waste, leaves of maize, used citronella leaf, sugarcane bagasse, Sägespäne, jute, used tea leaf waste, synthetic compost of button mushrooms, paper mill sludges, coffee byproducts, tobacco waste, cereal straw and waste paper are some of the substrate options.
Paddy straw is the most commonly used substrate.
Compost preparation for milky mushrooms
Substrate can be chopped in size of 4 to 5 cm or 1 to 2 cm.
Substrate is soaked in clean water for almost 6 hours.
Pasteurization of the substrate depends on the level in which farming is being done.
Small scale production:soaked in hot water at 80 degrees Celsius for 2 hours
Semi- commercial production:Steamed at a temperature of 80 degrees Celsius in steam chamber.
Full-fledged commercial production:substrate is subjected to 121 degrees Celsius temperature with 15-pound op pressure for 15 minutes in an autoclave.
At the end of this process the moisture content of substrate should be around 60%.
Spawning of milky mushroom
The substrate is kept in Polythene tube of dimensions 60 cm x 40 cm and a thickness of 100 gauge.
Organic supplements like wheat bran, paddy husk, maize meal or boiled wheat grain can also be added per bag. 100 grams per bag should be enough.
The substrate in put in the tubing to a height of 7.5 cm and 35 grams of spawn is mixed with the substrate.
Three such layers are made and the bag is closed with an insulating material like cotton.
The bag is lined with holes of 1 cm diameter for gas exchange. 20 such holes per bag are enough.
Spawn running of milky mushrooms
The bags incubated in a dark room with temperature of 30 to 38 degree Celsius and relative humidity of 80%.
The bags are kept in a dark room for 25-30 days.
Casing of milky mushrooms
Red soil or a mixture of red soil and Decomposed coir compost (1:1 ratio) is a good casing material for milky mushrooms cultivation bags.
The pH of the casing soil should be around 8.
The thickness of the casing is 2-3 cm.
Make sure to posturize the casing soil with chalk powder and kept in 15 psi in autoclave for few hours.
Posturizing the casing soil can also be done with 4 % formaldehyde a week before it is applied to the bags.
Proper turning of the casing soil is done regularly to eliminate most of the traces of formalin.
For casing of the bags, the bags are open and a uniform layer of casing material is allied to the substrate with the spawn.
Crop management and fructification of milky mushroom
After almost 10 days, the mycelium will penetrate the casing layer.
As the pinheads start appearing, the bags are moved to cropping room with a temperature of 30 to 38 degrees Celsius and relative humidity of 80 to 85%.
The room should have adequate light and ventilation as well.
Harvesting of milky mushroom
When the milky mushrooms grow to a diameter of 8 to 10 cm, the crop is harvested.
The milky mushrooms are harvested by twisting gently from the base.
By using this cultivation method, a 6-week crop can yield almost 1 kg of mushrooms per bag.
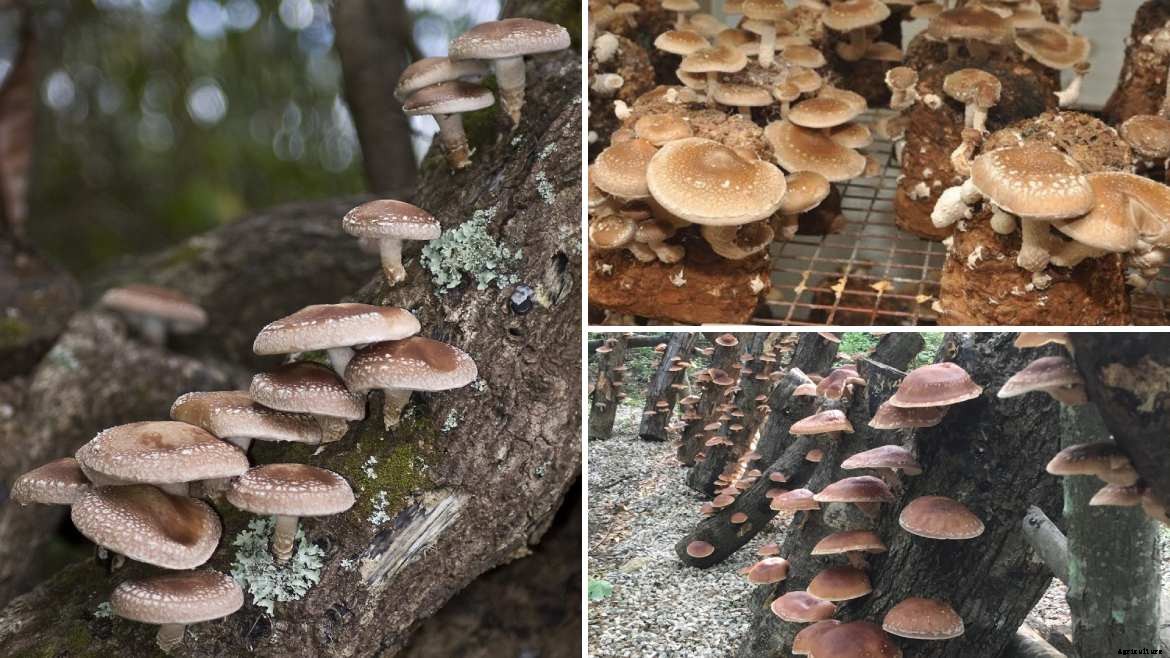
Guide to Shiitake mushroom farming in India
Shiitake mushroom, an edible and medicinal mushroom can be easily grown for commercial purposes.
It is not only a good source of protein and vitamin B, but its zero fat and sugar content make it a very good option for diabetics and heart patients.
Lentinan, a compound extracted from these mushrooms, is also used in manufacturing of a drug for cancer.
It can be cultivated in hardwood sawdust of teakwood, Sal and Indian Kino tree.
Substrate for Shiitake mushrooms
Rice bran, wheat bran, wood chips, hard wood sawdust, eucalyptus sawdust, teakwood saw dust, and calcium sulphate are some of the substrate options.
Saw dust should not be a fine powder, as water logging with reduce the speed of growth of mycelium.
A very coarse saw dust is also not recommended as it is hard to pack in bags and your compost will contain too much air.
A mix of coarse and fine sawdust is generally preferred.
Compost preparation for Shiitake mushrooms
Sawdust is wetted for few hours.
The substrate should not be wetted heavily. A good hydration test is squeezing the substrate in your hand as tightly as possible and only few drops of water should drip.
If there are dry patches, add little bit of water.
Good hydrated substrate ratio examples can be a mix of 1kg of sawdust, 250g of wheat/rice bran and 1.6 L of water ODER 1Kg of sawdust and 1.5L of water ODER 1Kg of wheat/rice bran with 0.5 L of water.
Pasteurization of the substrate can be done by subjecting it to 121 degrees Celsius temperature with 15-pound op pressure for 120 minutes in an autoclave.
At the end of this process the moisture content of substrate should be around 65%.
Spawning of Shiitake mushroom
The substrate is kept in Polypropylene bags.
1 Kg of substrate is mixed with 40 grams of spawning material.
Unlike other bag mushroom farming methods, no holes for ventilation are required in this case.
Spawn running of Shiitake mushrooms
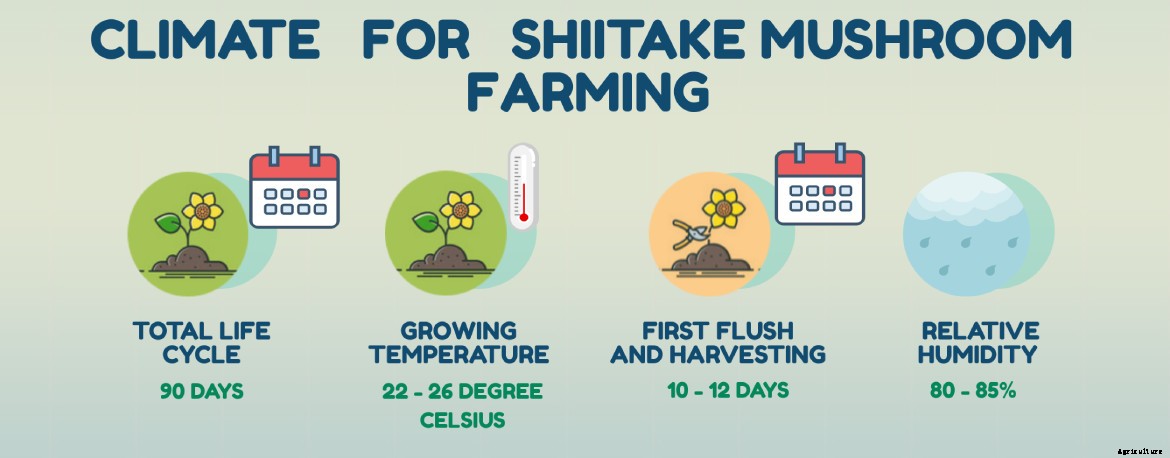
The bags incubated in a dark room with temperature of 22 to 26 degree Celsius.
The bags are kept in a dark room for 60-70 days.
Mycelial coat formation (a white substance) will start followed by the formation of blisters.
Crop management and fructification of Shiitake mushroom
Typischerweise Shiitake mushrooms take 8-12 weeks to colonize.
When the substrate turns completely brown, remove the Polypropylene bag. And moved to a cropping room.
The brown blocks are now shock treated with spraying cold water with a temperature of 10 to 15 degrees Celsius.
After 10-12 days of shock treatment, the shiitake mushrooms are ready to harvest. but this also depends on how cold is the weather.
As the pinheads start appearing in the cropping room with a temperature of 22 to 26 degrees Celsius and relative humidity of 80 to 85%.
The room should have adequate light and cross ventilation as well.
Harvesting of Shiitake mushroom
When the milky mushrooms grow to a diameter of 3 to 6 inches, the crop is harvested.
The milky mushrooms are harvested by twisting gently from the base.
Harvest the Shiitake mushrooms when the gills underneath the mushrooms are visible and the outer edge is slightly curved.
If the edge of the mushroom is flat, then the mushroom is over ripped. It is still edible though.
Don’t wash the mushrooms after harvesting.
Immediately refrigerate the mushrooms within 1 hour of harvesting.
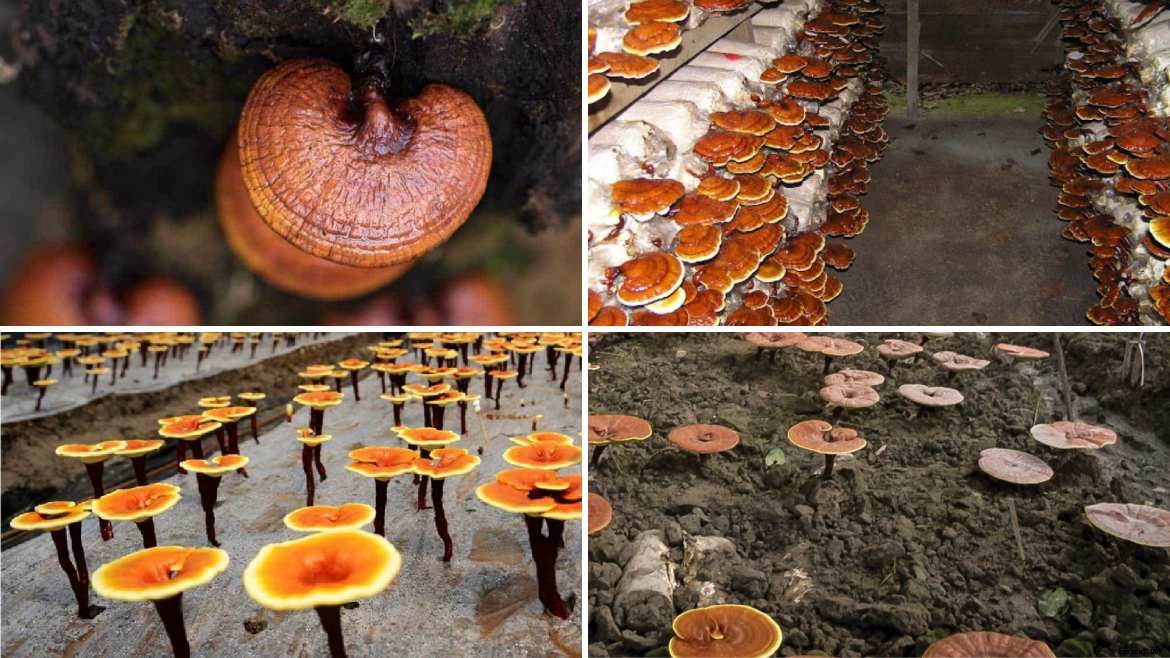
Guide to Reishi mushroom farming in India
Reishi mushroom is mostly cultivated because of its pharmacological importance. Global trade of this mushroom has crossed more than 2 billion dollars. This makes this mushroom as good candidate for cultivation commercially.
It is considered as almost a panacea in few cultures like Japanese and Chinese. It is believed to have medicinal characteristics such as anticancer, antioxidants, hypoglycemic, anti-HIV, anti-heart attack, cholesterol lowering as well as anti-angiogenic.
Since this mushroom is grown exclusively for medicinal purposes, its farming should be done organically.
It can be grown in poly-houses and also in the environmentally-controlled cropping rooms.
These mushrooms are typically naturally found in dead or dying hardwood in warmer temperatures in the month of May to November.
Substrate for Reishi mushrooms
Organically supplemented hardwood saw dust like eucalyptus tree saw dust or teak wood saw dust.
Saw dust of broad leaves trees like coconut, Sheesham and mango is also preferable.
Saw dust should not be a fine powder, as water logging with reduce the speed of growth of mycelium.
A very coarse saw dust is also not recommended as it is hard to pack in bags and your compost will contain too much air.
A mix of coarse and fine sawdust is generally preferred.
Compost preparation for Reishi mushrooms
Saw dust is mixed with 20% of wheat/rice bran.
Sawdust is wetted for few hours.
The substrate should not be wetted heavily. A good hydration test is squeezing the substrate in your hand as tightly as possible and only few drops of water should drip.
If there are dry patches, add little bit of water.
The desired pH level of 5.5 is obtained by adding calcium carbonate (chalk powder) and calcium sulphate (gypsum).
Pasteurization of the substrate can be done by subjecting it to 121 degrees Celsius temperature with 15-pound op pressure for 120 minutes in an autoclave.
At the end of this process the moisture content of substrate should be around 65%.
Spawning of Reishi mushroom
The substrate is kept in Polypropylene bags with the mouth of the bag sealed with a non-adsorbent material like cotton.
Sterilization of the bags is done in autoclave for 2 hours under a pressure of 22 PSI.
The substrate in the bag is spawned with wheat grain or saw dust spawn at the rate of 3% of the total dry weight.
Spawn running of Reishi mushrooms
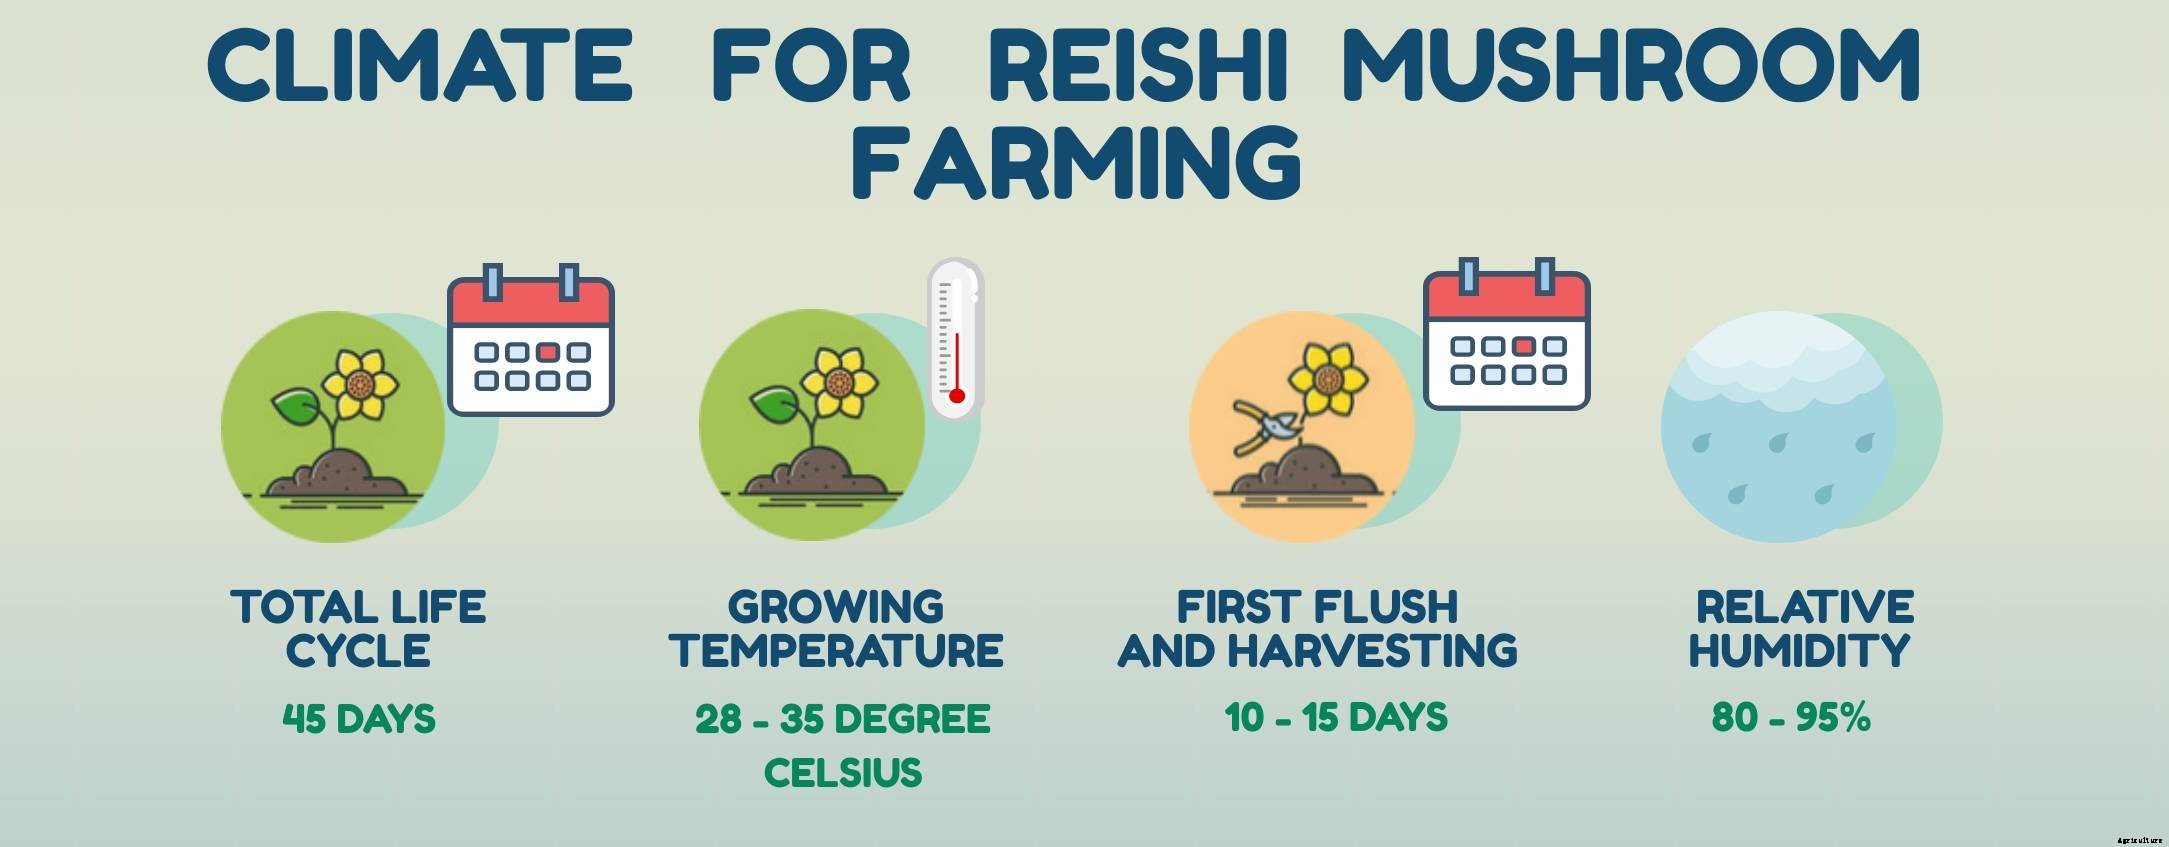
The bags incubated in a closed dark room with temperature of 28 to 35 degree Celsius.
The level of carbon dioxide is kept high in the incubation room.
The bags are kept in a dark room for almost 25 days.
Crop management and fructification of Reishi mushroom
After 25-30 days of incubation, the top part of the Polypropylene bag is cut off at the level of top part of the substrate.
Fruiting and pinning will start happening at this point .
The adequate environmental conditions like temperature of 28 degree Celsius, 800 lux light, 95% relative humidity and 1500 ppm carbon dioxide, are provided to the bags.
Humidity is reduced to 80% once the pins have started growing flatter whitish tops.
Now is the time when fresh air is also introduced to reduce the carbon dioxide levels to 1000 ppm.
When the caps become yellowish in colour, the temperature is lowered further to 25 degrees Celsius along with further reduction in relative humidity to 60%.
Harvesting of Reishi mushroom
Fully matured Reishi mushrooms have a reddish-brown top.
The Reishi mushrooms are harvested by two hands. One hand is used to tightly hold the root and the other hand can be used to pulling the Reishi mushroom out.
Harvest the Reishi mushrooms can also be done with cutting tools but it should be made sure that no residual steam is left on the compost log.
The first flush of Reishi mushrooms can be seen in almost 2 weeks.
After harvesting the first flush, again the environment of the room or polyhouse should be switched back to adequate environment for pinning. (i.e., 28 °C, 95%RH, 1500 ppm CO2, 800 lux light)
250 grams of Reishi mushrooms can be cultivated from 1 kg of substrate on an average.
Mushrooms are washed with water after harvesting.
After washing, Reishi mushrooms must be dried in temperatures lower than 50 degrees Celsius. A temperature of 35 degrees Celsius in drier cabinet is advisable.
Diseases and preventive measures in Mushroom cultivation
Some of the diseases of mushrooms are listed below:
MUSHROOM DISEASES
SYMPTOMS
CONTROL AND PREVENTION
Mushroom flies
These flies are small, delicate, Schwarz, yellowish or sometimes brown with different types of wing venation and size.
Spring is inside the wall of the mushroom house.
The insecticide should be added in the last turning of the compost.
Mites
They are small in size and are Majorly white, Gelb, red and brown. They can be found running over the surface of the fruit bodies, mushroom beds and on the floors and walls of the mushroom houses.
The damage the crop by feeding on the spawn to make holes in the mushroom caps and stalks and cause stunting of fruit bodies as well as brown spots on the caps and stems.
Proper pasteurization of compost. Proper hygiene and sanitation.
Disinfection of the mushroom houses by spraying 0.1% dicofol. Burning sulphur in the empty room.
Springtails
They are silver-grey 2 brown colours with a light violet band along the sides of the body and black cellular fields present on the head.
They are the main species that damage mushrooms. They enter mushroom houses along with organic matter.
They feed on mycelium from spawn. They also feed on the gills of the oyster mushroom destroying the lining and spit out the mycelial strands at the base of the stripes.
They also attack the fruiting bodies of button mushrooms and cause slight pitting and browning at feeding sites.
Cleaning surrounding and inside of the mushroom house.
Proper disposal of spent compost. Proper pasteurization of composed and casing material.
Raising the crop above the floor level.
Brown plaster mould
Occurs on the cropping trees, initially cloudy white appearance later changes to brown.
Originally fungus rises in compost. too wet compost, high temp. (28-32) c during spawn run and cropping at more than 18 C encourages Infection.
Maintain suitable temp. during the spawn run and cropping 2% of formalin
Bubble disease:– C.O.:Mycogone perniciosa
Dense white mat of mycelium leading to reduction in yield.
Swollen stalk and smaller cap at early stage. Unpasteurized compost also leads to it. An amber liquid appears on infected mushrooms.
Mushrooms become brown. Bubbles may be as large as a grapefruit. It is also a parasite of wild mushrooms.
It produces two spore types, one which is small and water-dispersed like Verticillium. the second which is a large resting spore capable of persisting for a long time in the environment.
Appearance of brown slightly sunken blotches on the mushroom cap Spots are irregular, yellowish to dark brown.
Main source of infection is infection soil and separate through flies, mites and nematodes.
Casing soil sterilization and proper ventilation . Use of chlorinated water.
Spray of terramycin @ 9mg/f on beds.
Types of Mushrooms
Based on the purpose of this article, we can categorize types of Mushrooms in the following two categories.
Based on Scientific name (Genus, Species and Common name)
GENUS
SPECIES
COMMON NAME
Agaricus
arvensis
Horse Mushroom
Augustus
The prince
bernardii
bisporus
Common store mushroom
brunnescens
button mushroom
commercial mushroom
bitorquis
Spring agaricus
rodmanii
campestris
Field or meadow mushroom
crocodilinus
Crocodile agaricus
fuscofibrillosus
Bleeding agaricus
haemorrhoidarius
Bleeding agaricus
Amanita
phalloides
Death cap
Armillaria
matsutake
Matsutake
mellea
Honey or oak mushroom
ponderosa
American matsutake or pine mushroom,
recently renamed Tricholoma magnivelare
Auricularia
auricula
Cloud ear mushroom or Judas' ear
polytricha
Wood ear mushroom,
tree ear, or black fungus
Boletus
aereus
appendiculatus
Butter bolete
badius
Bay bolete
barrowsii
Barrow's bolete
bicolor
Two-colored bolete
edulis
Porcini, cèpe, or king bolete
mirabilis
Admirable bolete
pinicola
Variant of B. edulis
regius
Regal bolete
zelleri
Zeller's bolete
Bovista
verschieden
Puffball
Calbovista
verschieden
Puffball
Calvatia
gigantea
Puffball
Cantharellus
cibarius
Golden chanterelle or egg mushroom
cinnabarinus
Cinnabar-red chanterelle
lateritius
Smooth chanterelle
subalbidus
White chanterelle
tubaeformis
Trumpet chanterelle
Chlorophyllum
molybdites
Green-spored parasol mushroom
morgani
Clitocybe
fragrans
Fragrant clitocybe
odora
Anise-scented
nuda
Blewit
Clitopilus
prunulus
Sweetbread mushroom
Coprinus
atramentarius
Alcohol inky cap
comatus
Shaggy mane, lawyer's wig, or inky cap
micaceus
Mica cap
Cortinarius
armillatus
Bracelet cortinarius
Craterellus
cornucopioides
Horn of plenty, trumpet of death,
or black chanterelle
Entoloma
abortivum
Aborted entoloma
Flammulina
velutipes
Enoki, velvet foot, golden needle,
or winter mushroom
Gomphus
clavatus
Pig's ear
Grifola
frondosa
Hen of the woods
Polypilus
Gyromitra
gigas
Snowbank false morel
Helvella
lacunosa
Black saddle mushroom
Hericium
coralloides
Coral hericium
caput ursi
americanum
erinaceus
Bear's head, monkey head, or pom-pom
ramosum
Comb tooth mushroom
Hydnum
repandum
Hedgehog mushroom or sweet tooth
umbilicatum
Belly-button mushroom
Hygrophorus
russula
Russula like waxy cap
Lactarius
deliciosus
Delicious milky cap
fragilis
Candy cap
Indigo
Blue milky cap
rubrilacteus
Bleeding milky cap
Leccinum
aurantiacum
Orange-capped scaber stalk
insigne
Aspen scaber stalk
manzanitae
Manzanita scaber stalk
scaber
Scaber stalk
Lentinus
edodes
Shiitake, black forest mushroom
Lepiota
molybdites
Green-spored parasol
Chlorophyllum
Lepiota
procera
Parasol mushroom
rhacodes
Shaggy parasol mushroom
or drumstick mushroom
Lepista
nuda
Blewit
Clitocybe
Lycoperdon
verschieden
Puffball
Marasmius
oreades
Fairy-ring mushroom
scorodonius
Garlic marasmius
Morchella
angusticeps
Morel or sponge
conica
Morel or sponge
deliciosa
Morel or sponge
esculenta
Morel or sponge
Phlogiotis
helvelloides
Apricot jelly mushroom
Pholiota
nameko
Nameko
aurivella
Butter mushroom
Pleurocybella
porrigens
Angels' wings
Pleurotus
ostreatus
Oyster mushroom
sajor-caju
Oyster mushroom
Pluteus
cervinus
Fawn mushroom
Polypilus
frondosa
Hen of the woods
Grifola
Polyozellus
multiplex
Clustered blue chanterelle
Polyporus
umbellatus
Umbrella polypore
Ramaria
botrytis
Red-tipped coral mushroom
Rozites
caperata
Gypsy mushroom or chicken of the woods
Russula
aeruginea
Tacky green russula
cyanoxantha
Charcoal burner
Delikatesse
Short-stem russula
nigricans
Blackening russula
vesca
Bare-toothed russula
xerampelina
Shellfish-scented russula
Sparassis
crispa
Cauliflower mushroom
radicata
Strobilomyces
confusus
Old man of the woods
floccopus
Stropharia
rugosoannulata
Wine-cap stropharia
Suillus
brevipes
Short-stalked slippery cap
granulatus
Dotted-stalk suillus
pictus
Painted suillus
Terfezia
bouderi
Black kame
claveryi
Brown kame
Tremella
fuciformis
Snow mushroom, white jelly fungus,
or silver ear mushroom
Tricholoma
flavovirens
Man on horseback
equestre
magnivelare
Pine mushroom or American matsutake
Knolle
aestivum
Summer truffle
gibbosum
Oregon white truffle
magnatum
Italian white truffle
melanosporum
French black truffle
texensis
Texas white truffle
Volvariella
volvacea
Straw mushroom or paddy straw mushroom
Based on local Indian Mushroom variety (Cultivated in India for edible and medicinal purposes)
Agaricus Bisporus
Pleurotus Sajor-caju
Volcvariella Volvacea
Calocybe Indica
Pleurotus Ostreatus
Auricularia Spp.
Pleurotus Florida
Lentinula Edodes
Pleurotus Djamor
Ganoderma Lucidum
Pleurotus Eryngii
Hypsizygus Tessulatus
Final words
Mushroom farming in India has seen a considerable growth worldwide. Its not only being farmed for dietary consumption but also for medicinal purposes. One of the most attractive aspect of doing mushroom farming is, its still very lucrative even if done in a small scale.
Mushroom farming in India presents itself as a very good business idea for not only budding entrepreneurs / farmers but also veterans of agriculture.
I hope this article was able to answer many of your questions. Please feel free to comment your thoughts. Any suggestion or advise will be highly appreciated. Ebenfalls, kindly do post any questions which are still unanswered. I would be happy to assist. Please feel free to share the article with anyone who you think is in need of assistance in gaining information on mushroom farming / mushroom cultivation.